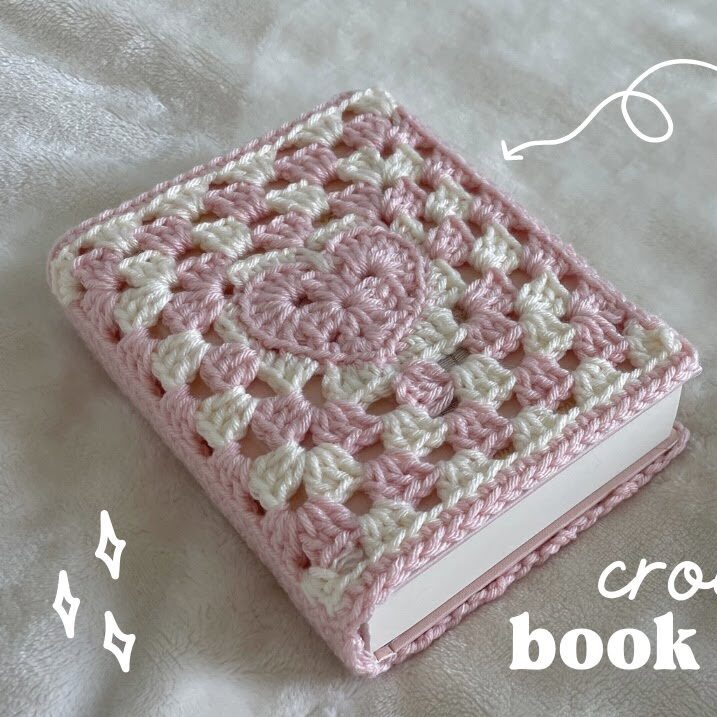
In a world filled with digital screens and e-readers, there’s still something magical about holding a physical book in your hands. For many of us, books are companions, comforters, and collections of memories. So, what better way to honor your favorite reads than by wrapping them in love — literally — with a handmade crochet book cover from a heart granny square?
Whether you’re gifting a journal to a friend, decorating your bookshelf, or simply safeguarding your paperbacks, this project combines sentiment with practicality. It’s not just a crochet pattern — it’s an invitation to add a personal, heartwarming touch to your reading experience.
This blog will guide you through the entire journey of creating a beautiful crochet book cover using a heart-shaped granny square motif. From understanding the materials and sizing to learning how to personalize your cover with colors, buttons, or ribbons — we’ll leave no stone unturned. Even if you’re a beginner, this pattern is an approachable and rewarding introduction to crochet artistry.
Let’s dive into the creative joy of making something beautiful with your hands — and giving your beloved books the cozy homes they deserve.
Why Crochet a Book Cover?
There are many reasons why crocheting your own book cover is a fabulous idea. Here are just a few:
1. Protect Your Books in Style
Books tend to wear over time, especially when tossed in bags or used daily. A crocheted book cover acts like a soft armor, protecting edges and covers from scratches, dust, and damage.
2. Make Thoughtful Handmade Gifts
A crochet book cover, especially with a heart motif, makes a meaningful gift. You can personalize it with the recipient’s favorite colors or initials and pair it with a journal, planner, or novel.
3. Express Creativity and Practice Skills
This project allows you to explore stitches, shapes, and construction. It’s a small enough project for beginners but still provides room to learn and experiment.
4. Eco-Friendly Reusable Wrap
Use it as a reusable gift wrap for notebooks or books during holidays and birthdays. A zero-waste solution that’s beautiful and functional!
5. Boost Your Handmade Business
If you sell crochet goods, book covers are unique, lightweight, and easy to customize. They’re perfect for book fairs, Etsy stores, or local markets.
Now that you’re fully on board, let’s get started by gathering your materials.
Materials You’ll Need
Before the magic begins, let’s make sure you have everything required for this project. Most of these are likely already in your stash if you’ve crocheted before.
Yarn
For best results, choose yarn that is soft but has enough structure to hold the book shape. Too thin and floppy? The cover won’t stay on. Too thick and stiff? It may not feel great to hold or may not stretch properly.
Recommended Yarn Types:
- Cotton or cotton blends: Great stitch definition and structure
- Acrylic: Budget-friendly and comes in many colors
- Cotton-acrylic blends: Soft, slightly stretchy, and durable
Yarn Weight:
- DK (Light Worsted) or Worsted (Medium Weight) is ideal.
Yardage:
- Approximately 80–120 yards depending on book size and motif layout
Hook
Check your yarn label for the recommended hook size. As a general guide:
- DK Yarn: 4.0 mm (G) hook
- Worsted Yarn: 5.0 mm (H) hook
If you crochet loosely, consider going down a size for more structure.
Notions
- Yarn needle for sewing and weaving in ends
- Scissors
- Measuring tape or ruler
- Stitch markers (optional)
- Button, ribbon, or snap for closure (optional)
Now that you’re set, let’s talk about the construction process and how this cover will come together.
Project Overview and Construction
The Heart Granny Square Book Cover is built using a few key components:
- Heart Granny Squares: You’ll make two to three of these depending on your book’s size and the design layout you want.
- Side Panels: These help wrap around the spine and hold the book cover in place.
- Inner Flaps or Pockets: These tuck the book cover into the crocheted jacket.
- Edging and Closure: A neat border with optional ties, buttons, or ribbons for closure.
Now, let’s go over each part in detail.
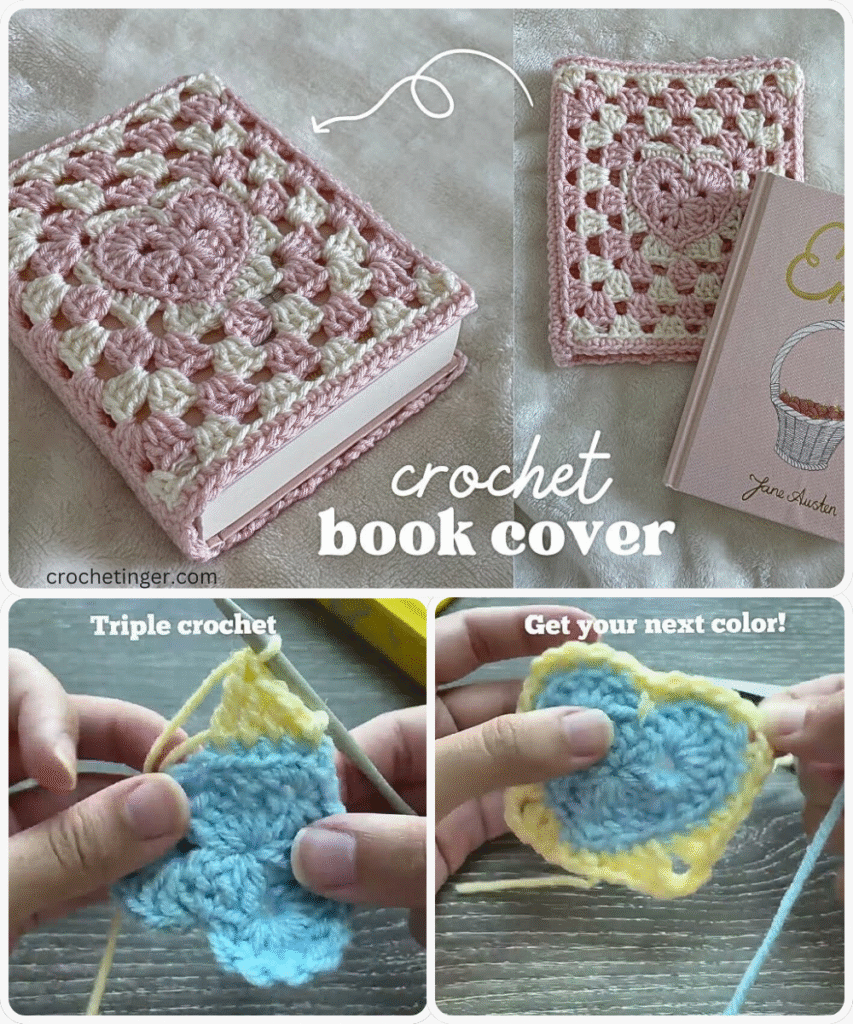
How to Make a Heart Granny Square
We’ll begin with creating the star of the show — the heart granny square. These are traditional granny squares with a heart shape in the center. There are many variations, but here’s a beginner-friendly pattern.
Abbreviations (US terms)
- ch = chain
- sl st = slip stitch
- sc = single crochet
- hdc = half double crochet
- dc = double crochet
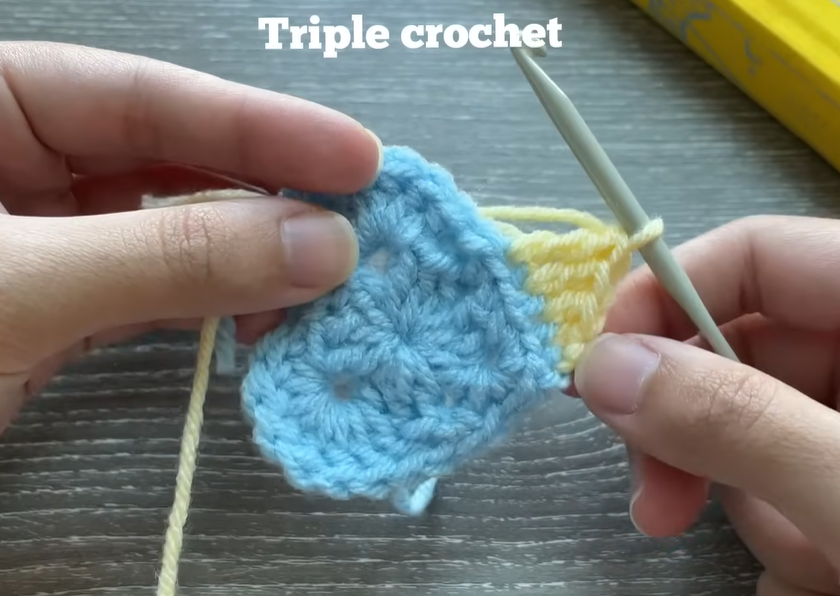
- tr = treble crochet
- sp = space
- st(s) = stitch(es)
Heart Motif Instructions
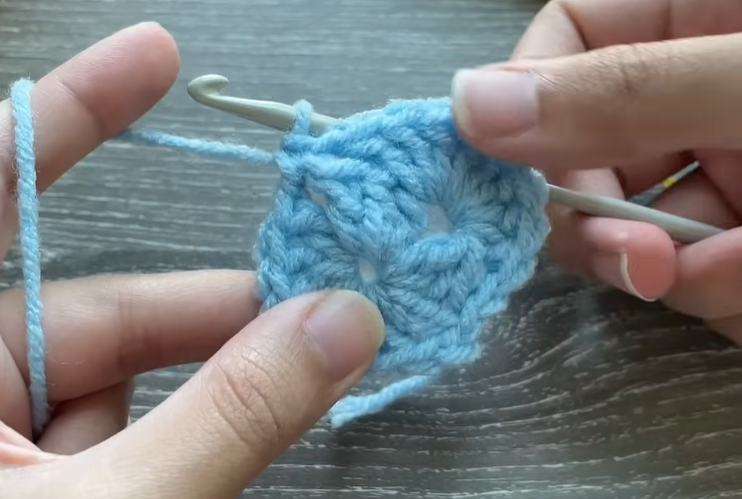
Step 1: The Heart Center
With your chosen heart color (red, pink, or any contrast shade), ch 4 and sl st to the first ch to form a ring.
Round 1: Ch 3 (counts as dc), 2 dc into ring, ch 1, 3 dc into ring repeat 3 more times. You should have 4 clusters of 3 dc. Sl st into top of ch-3 to close.
Round 2: Begin shaping the heart. Ch 3, dc in same st, 2 dc in next st. Dc in next 2 sts. (2 tr, ch 1, 2 tr) in next ch-1 space to create the bottom point of the heart. Dc in next 2 sts. 2 dc in next 2 sts. Sl st to first ch-3 to finish.
Step 2: Square It Up
Switch to background color (e.g., white, cream, or pastel). You’ll now work in corners to square off the round heart shape.
Round 3: Attach yarn to top corner, ch 3, dc, ch 2, 2 dc in same space (corner made). Continue working dc into each stitch, and 2 dc, ch 2, 2 dc in each corner. Sl st to join.
Repeat rounds to grow the square to the desired size (usually 4–6 inches for book covers).
Make 2 or 3 of these squares depending on the size of your book and the layout you choose.

Measuring Your Book for a Custom Fit
A perfect fit ensures the book cover looks polished and doesn’t slip off.
Measure your book’s:
- Height
- Front width
- Spine width
Let’s say your book is:
- Height: 8 inches
- Width: 5 inches
- Spine: 1 inch
So your total width when opened flat = 5 + 1 + 5 = 11 inches.
You want your final crochet piece (when laid flat) to be:
- 8 inches tall
- 11 inches wide
- Add 1 inch for stretch allowance
Final size = 8 inches high x 12 inches wide
Now, use your heart squares to build up to this measurement. You can join them side-by-side, top-bottom, or use one as a centerpiece and build around with panels.
Joining the Squares
Once you’ve made the required number of squares, it’s time to join them into one rectangle that fits your book’s measurements.
Joining Methods:
- Slip Stitch Join: Seamless, flat look
- Single Crochet Join: Slight ridge, adds character
- Whip Stitch: Easy hand-sew for invisible seam
Lay out your squares in the pattern you want. Join using your preferred method until you’ve built a rectangle the right size.
Optional: Work a few rounds of single crochet around the whole rectangle to even out the edges.
Adding Inner Flaps
To keep the cover securely on the book, add inner flaps or “pockets” on both sides. These flaps will hold the book’s front and back cover in place.
How to Make Flaps:
- With the main rectangle flat, fold each short side inward about 2 inches.
- Use pins or stitch markers to hold the folds.
- Seam only the top and bottom edges of the folded sections, leaving the sides open to slide book covers in.

Edging and Finishing Touches
A simple border adds elegance and polishes the entire project.
Border Options
- Single Crochet Border: Clean and minimalist
- Picot Edge: Decorative and lacy
- Shell Border: Pretty and feminine
Work around the entire edge using your border of choice.
Adding a Closure
If you’d like to keep your book shut, consider adding:
- Button Loop Closure: Sew a button on one side, and chain a loop on the opposite flap
- Ribbon Ties: Crochet or sew on ribbon ties
- Elastic Band: Crochet a small tab on the back and slide in an elastic loop
Customization Ideas
Now that your base is ready, let’s talk customization!
Add Appliqués:
Sew on small crochet flowers, initials, stars, or even themed motifs like suns, moons, or animals.
Color Play:
Use complementary or contrasting colors for each square and the edging.
Texture Mix:
Try bobble stitches or popcorns around the heart square for added dimension.
Embroider:
Use tapestry needles to embroider small messages or names onto the squares or flaps.
Use Fabric Lining (Optional):
For a luxurious touch, sew in a fabric lining inside the cover using felt or cotton.
Care Instructions
To ensure your crochet book cover lasts a long time:
- Hand wash gently with mild soap
- Lay flat to dry
- Avoid heavy stretching
- Store away from sharp objects or zippers that may snag the yarn
Troubleshooting Common Issues
1. My cover is too tight.
Try adding another round or two to your squares, or use a slightly larger hook.
2. The squares aren’t the same size.
Ensure consistent tension and count your stitches. Block squares before joining.
3. My flap doesn’t hold the book cover well.
Check your measurements and use a tighter stitch for flaps (e.g., single crochet).
Video Tutorial:
Conclusion: A Book Cover That Speaks from the Heart
Creating a crochet book cover from a heart granny square is a project full of charm, purpose, and creativity. It’s a labor of love that transforms an ordinary book into something truly personal. Whether you’re making one for yourself, crafting a handmade gift, or selling them as part of your crochet business, each stitch tells a story — and protects one too.
So grab your favorite yarn, turn on your favorite podcast, and start stitching your way to a more beautiful book collection. This isn’t just crochet — it’s art, it’s warmth, it’s a hug for your books.
You may be interested:
- Crochet Women Cardigan: A Complete Step-by-Step Guide
- Crochet Coaster Motif: A Step-by-Step Guide to Creating Beautiful Coasters
- How to Crochet a Charming Daisy Motif: A Step-by-Step Pattern
- Easy Crochet Hair Band: elevate your style