
Why Crochet Baby Ponchos Are the Perfect Project

Crocheting has long been more than just a hobby—it’s a heartwarming craft steeped in love, patience, and creativity. One of the most rewarding projects a crocheter can take on is making a baby item, and among the many options, a crochet baby poncho stands out. Why? Because it blends functionality, fashion, and cuteness in one wearable gift. Whether you’re a beginner wanting to practice basic stitches or a seasoned crocheter seeking a relaxing project, a baby poncho is a versatile and delightful choice. In this blog, we’ll take a deep dive into the world of baby ponchos—from yarn selection and sizing to intricate step-by-step instructions, customization ideas, and care tips.
This blog is crafted especially for beginners, but even experienced crocheters will find it helpful for refining their techniques or discovering new design ideas. Best of all, it’s designed to be AdSense-friendly and highly valuable for readers—so if you’re hoping to start your own crochet blog or YouTube channel, this is the kind of content that can drive interest and trust.
Understanding the Crochet Baby Poncho: A Brief Overview
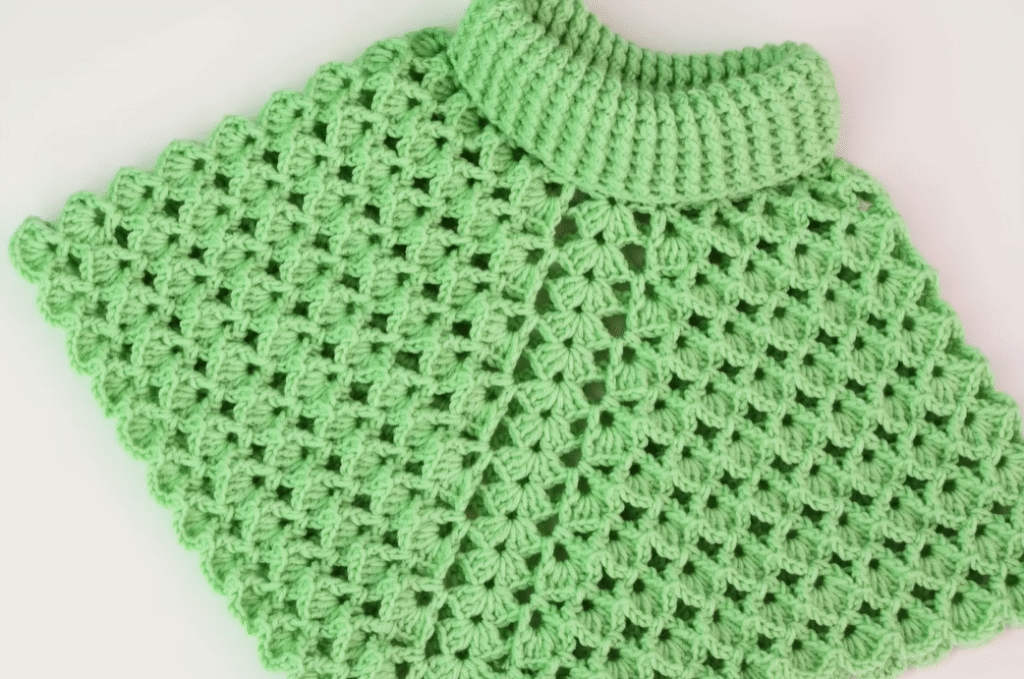
A poncho is a simple yet timeless garment made of a single piece of fabric that drapes over the body. For babies, it’s an ideal choice because it allows freedom of movement while keeping them warm. Unlike sweaters or jackets, baby ponchos don’t have sleeves, buttons, or complicated construction, which makes them easy to put on and take off—a blessing for parents and caretakers.
The crochet baby poncho in this guide will be based on a granny square design or traditional V-shape structure. It’s beginner-friendly, customizable in size and color, and suitable for babies from newborn to 24 months. You can also adjust the pattern to fit toddlers with a few changes in rows and measurement.

Materials You Will Need
Before starting your project, gather the following materials:
- Worsted weight yarn or DK weight yarn (baby-safe acrylic or cotton yarns are ideal)
- A 4.0 mm or 4.5 mm crochet hook (check yarn label for recommendations)
- Scissors
- Tapestry needle for weaving in ends
- Stitch markers (optional but helpful for maintaining symmetry)
- Measuring tape or ruler
- A small button or drawstring (optional for neck closure)
- Optional decorative add-ons like pom-poms or small crochet flowers
Choosing the Right Yarn for Baby Projects
Baby ponchos require soft, lightweight, and breathable yarn to ensure comfort. Yarn that is too bulky can overwhelm the baby, while very thin yarn might not provide enough warmth. Look for yarns labeled as “baby yarn” or “hypoallergenic.” These are typically soft and machine-washable.
Popular yarn choices:
- Bernat Baby Softee
- Paintbox Yarns Baby DK
- Lion Brand Baby Soft
- Cotton yarn (for warmer climates)
Choose pastel colors for a classic baby look or bright, fun shades for a playful twist. Don’t forget to pre-wash your yarn if you’re unsure of how it behaves after laundering.
Understanding Basic Crochet Stitches
Here are the essential stitches you’ll use in this project:
- Chain (ch)
- Slip Stitch (sl st)
- Single Crochet (sc)
- Double Crochet (dc)
- Half Double Crochet (hdc)
If you’re new to crochet, spend some time practicing these stitches before starting the project. Many free tutorials and videos can walk you through them with ease.
Measuring and Sizing for Baby Ponchos
Sizing is one of the most critical aspects when making clothing for babies. Here’s a rough guide for sizing:
- Newborn to 6 months: 12″–14″ long from neck to bottom edge
- 6 to 12 months: 14″–16″
- 12 to 24 months: 16″–18″
- 2 to 3 years: 18″–20″
You can measure from the base of the baby’s neck to the desired hemline to be more precise. Remember, babies grow fast, so slightly larger is usually better than too snug.
Pattern: Crochet Baby Poncho with V-Shape Construction
This pattern uses a V-shape construction method, which is made by increasing at the front and back center of your work.
Foundation Row
- Chain 60 (or a multiple of 4 if you want to size up or down).
- Join the chain into a loop with a slip stitch, being careful not to twist the chain.
Round 1
- Chain 3 (counts as dc).
- Dc in the next stitch and each stitch around, placing a stitch marker at stitch 30 and stitch 60 (these will be your front and back V points).
- In the marked stitch: (dc, ch 2, dc) to create the point.
- Repeat this pattern until you return to the starting chain.
- Join with a sl st to the top of the chain 3.
Round 2 to Desired Length
- Chain 3.
- Dc in each stitch until you reach the stitch before the marked stitch.
- In the marked stitch: (dc, ch 2, dc).
- Continue around, making sure to create the point at the same two places every round.
- Add more rounds until you reach the desired length.
Finishing Edges For a soft, finished look, work a single crochet or shell stitch border around the bottom and neckline.
Optional Hood To add a hood:
- Rejoin yarn at the neckline.
- Chain 2 and work 20-25 rows of hdc back and forth, not in the round.
- Fold in half and sew the top edge together to form a hood.
Optional Drawstring or Button Closure If desired, make a simple chain of 70-90 and weave it through the neckline to act as a tie. Alternatively, sew a small button at the top edge and create a loop on the opposite side.


Customization Ideas
The beauty of crochet is its flexibility. Here are some creative ways to personalize your baby poncho:
- Add ruffles to the hem by increasing stitches in the final round.
- Attach mini tassels or pom-poms at the points.
- Use a gradient yarn or multiple colors for stripes.
- Crochet small flowers, stars, or animal ears and attach them to the poncho.
- Use variegated yarn for a colorful, patterned look with no effort.
Troubleshooting Common Issues
Even experienced crocheters run into problems. Here are a few common mistakes and how to fix them:
- Poncho is too tight: You may be using a hook that is too small or crocheting too tightly. Try loosening your tension or switching to a larger hook.
- Poncho is uneven: Make sure you’re increasing only at the marked stitches. Use stitch markers consistently.
- Neck hole is too small: Add a few extra chains at the start or skip fewer stitches when joining the foundation round.
Care and Washing Tips
Baby items need frequent washing, so be sure your yarn is machine-washable. Always follow these steps:
- Wash in cold or lukewarm water
- Use baby-safe detergent
- Lay flat to dry to maintain the shape
- Avoid fabric softener for cotton yarns
Crochet Poncho as a Gift Idea
A crochet baby poncho makes an ideal handmade gift. Whether for a baby shower, birthday, or holiday, it’s a present that reflects love and effort. You can even pair it with a matching hat or booties for a complete set. Consider making different versions in various sizes and colors to give as gifts throughout the baby’s first year.
Incorporating the Project Into a Crochet Business
If you’re planning to monetize your crochet skills, this baby poncho pattern can be a great seller. Use quality photos and offer size variations in your pattern listings. You can sell your creations on Etsy, at craft fairs, or on your own website. Make sure to list materials used, care instructions, and customization options.
Video Tutorial:
Conclusion: A Project You’ll Return to Again and Again
The crochet baby poncho is a timeless and rewarding project that offers warmth, comfort, and joy. With minimal materials and simple stitches, you can create a beautiful piece that becomes a cherished item in a baby’s wardrobe. This beginner-friendly pattern can be your go-to gift, inventory piece, or personal keepsake. Plus, it’s easily customizable and works up quickly, making it perfect for crafters of all skill levels.
Thank you for following along this detailed guide. Whether you’re crocheting your very first poncho or looking to refine your skills, we hope this blog has inspired and empowered you. Don’t forget to share your finished poncho on social media, tag your favorite crochet communities, and inspire others with your handmade love.
You may be interested:
- Master the Art of the Lace Flower Crochet Stitch
- Easy Knitted Slipper Socks You Can Make
- How to Crochet a Charming Daisy Motif: A Step-by-Step Pattern
- Easy Crochet V Neck Top: A Complete Guide to Crafting Your Own Beautiful Blouse


