Knitting a cardigan for a child is not only a delightful activity, but also a thoughtful gift that will warm and give comfort. Whether you’re an experienced knitter or a beginner looking to take on a new challenge, knitting a baby cardigan is a rewarding activity. In this step-by-step master class, we will look at how to knit a children’s cardigan with knitting needles so that your precious baby is wrapped in love and warmth.
Skill Level: Intermediate
Materials Needed:
- Soft baby yarn (worsted weight is recommended)
- Circular knitting needles (size according to the yarn label)
- Stitch markers
- Yarn needle
- Scissors
- Buttons (optional)
Pattern:
Gauge:
Approximately 20 stitches and 24 rows => 4 inches (10 cm) in stockinette stitch (where you knit one row and then purl the next row).
Sizes:
This pattern provides instructions for a newborn to 6-month-old size. The completed measurement around the chest is roughly 18 inches (46 cm) for the size designed for a 6-month-old.
Instructions:
Note: The pattern is worked in one piece from the bottom up, then the sleeves and collar are added later.
Back:
Cast on 52 stitches (or desired number of stitches to achieve the width you want). Work in garter stitch (knit every row) for 8 rows for the bottom border.
Transition to the stockinette stitch (perform one row of knitting followed by one row of purling) and persist in this pattern until the work reaches an approximate length of 8 inches (20 cm) from the edge where the casting on was initiated, concluding with a purl row.
Armholes:
Following row (opposite side): Work a knit stitch on 19 stitches, position a marker, complete a bind off on 14 stitches, position a marker, and knit until reaching the end.
Left Front:
Row 1 (opposite side): Purl up to the marker, slip the marker, cast off 2 stitches, purl up to the end.
Row 2 (right side): Knit up to the marker, slip the marker, perform a decrease by knitting the next two stitches together, and continue knitting until you reach the end.
Repeat Rows 1 and 2 three more times (four buttonholes in total). Keep working in stockinette stitch until this piece reaches a length of approximately 8 inches (20 cm) from the edge where you began casting on.
Right Front:
Join a new yarn to the last bound-off stitch on the holder for the right front.
Row 1 (right side): Knit up to the final 2 stitches, and perform a reduction of one stitch (achieved by knitting together the subsequent pair of stitches).
Row 2 (wrong side): Purl across.
Continue to replicate Rows 1 and 2 repeatedly until this segment reaches an approximate length of 8 inches (20 cm) starting from the edge where you initially cast on.
Sleeves (make 2):
Cast on 30 stitches (or desired number of stitches to achieve the sleeve width you want). Engage in the garter stitch pattern (knit every row) for a total of 8 rows to create the cuff border.
Transition to the stockinette stitch (where you knit one row and purl the next) and add 1 stitch at the start and conclusion of every fourth row until you possess a total of 54 stitches.
Keep working in stockinette stitch until the sleeve has a length of about 6 inches (15 cm) from the edge where you started, concluding with a row of purl stitches.
Shoulder Seams:
Fold the back and fronts in half lengthwise with the right sides together and seam the shoulder edges together using your preferred seaming method.
Sleeve Seams:
Fold each sleeve in half with the right sides together and seam the edges together using your preferred seaming method.
Collar:
Commencing from the rear neckline, gather stitches uniformly along the neckline, encompassing the front borders and the edges of both sleeves (around 80-100 stitches).
Engage in garter stitch (knit each row) for a total of 8 rows to create the collar border.
Bind off all stitches.
Finishing:
Weave in any loose ends. Block the cardigan if needed to even out the stitches and make it look more polished.
Step-by-step guide:
Step 1: Gauge Swatch
Before diving into the cardigan project, it’s essential to create a gauge swatch. This helps ensure that your stitches and rows match the pattern’s specifications. Cast on approximately 20 stitches and knit a few rows in stockinette stitch (knit on the right side, purl on the wrong side). Measure the swatch using a ruler, and if it doesn’t match the recommended gauge (usually found on the yarn label), adjust your needle size accordingly.
Step 2: Casting On
Start by casting the required number of stitches for the size of the cardigan you want to make. The number of stitches will vary depending on the size and pattern you choose. Generally, casting on 60-70 stitches for a newborn to 6-month-old cardigan is a good starting point.
Step 3: Ribbing
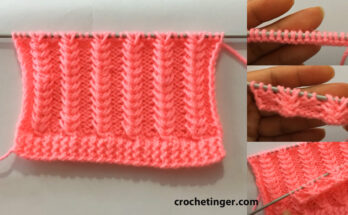
To create a neat and stretchy edge for the cardigan, begin with a ribbing pattern. Commonly, a 1×1 rib (alternating knit and purl stitches) or 2×2 rib (two knit stitches, two purl stitches) is used. Knit the ribbing for about 1 to 1.5 inches, depending on your preference.
Step 4: Main Body
After completing the ribbing, switch to the main stitch pattern. For a basic cardigan, stockinette stitch (knit on the right side, purl on the wrong side) is ideal. Continue knitting in stockinette stitch until the cardigan measures the desired length from the cast-on edge to the underarm (approximately 6-7 inches for a newborn to 6-month-old size).
Step 5: Shaping the Armholes
To shape the armholes, you will need to divide the stitches for the front, back, and sleeves. Use stitch markers to mark the armhole positions. For example, if you have 60 stitches, you might have 15 stitches for each sleeve and 30 stitches for the front and back each. Knit across the first 15 stitches, place a marker, then knit the next 30 stitches, place another marker, knit the next 15 stitches, and place the last marker.
Step 6: Creating the Sleeves
For the sleeves, you will be working with the stitches you set aside. Join a new ball of yarn to one sleeve’s stitches and knit in stockinette stitch until the sleeve reaches the desired length (usually 6-7 inches for long sleeves or 3-4 inches for short sleeves). Repeat for the other sleeve.
Step 7: Body and Button Bands
Once the sleeves are complete, continue knitting the front and back stitches in stockinette stitch for the desired length, typically equal to the back length.
Next, add button bands (if desired) to the front edges of the cardigan. Knit a few rows in garter stitch (knit every row) to create a clean and stable edge.
Step 8: Finishing Touches
To finish your baby’s cardigan, bind off all stitches. Employ a yarn needle to intertwine any unraveled extremities. If you’ve opted for button bands, attach buttons to the opposite side of the cardigan.
Video tutorial:
Video tutorial 2:
Conclusion:
Congratulations! You’ve just completed knitting a beautiful and cozy baby cardigan. This handmade garment will undoubtedly be treasured by its recipient and is sure to keep them warm and stylish. Knitting for babies is a joyful experience, and you can now explore various patterns and color combinations to create a wardrobe full of adorable baby cardigans. Happy knitting!
You may be interested: