
Creating baby footwear with your own two hands is one of the most rewarding crafts you can pursue. And when those tiny shoes are stylish, sporty, and absolutely adorable like crochet baby basketball shoes, it takes the joy of crochet to a whole new level. Whether you’re an experienced maker or just starting out, this comprehensive guide will take you through every step to design and crochet a pair of mini athletic-inspired sneakers that are perfect for babies from newborn to 12 months.
In this post, we’ll go deep into the craft—covering every angle from selecting the right yarn and tools to shaping soles and uppers, plus offering expert-level tips on personalization, outfit pairings, business ideas, and even community engagement. This isn’t just a pattern. It’s a full roadmap to building your own world of crochet baby shoes.
Let’s lace up our hooks and begin this exciting journey into the world of crochet baby basketball shoes!
Why Crochet Baby Basketball Shoes?
Handmade baby items are treasured by families. They’re practical, meaningful, and often become keepsakes. Baby basketball shoes made with yarn are the perfect example of how crochet can be fashionable, fun, and functional.
Here are just a few reasons why these shoes are popular among crocheters:
- They’re miniature masterpieces that let you show off both skill and creativity.
- Parents love them because they’re soft, safe, and stylish.
- They’re gender-neutral or customizable for any baby.
- They’re great sellers at craft fairs and online shops.
- They make fabulous gifts that stand out in a sea of store-bought items.
Whether you’re making them as a one-time gift or building an entire product line, crochet baby basketball shoes are the kind of pattern that draws attention and admiration.
History and Inspiration Behind Baby Sneaker Designs
Baby sneaker-style booties are inspired by real athletic brands—Converse, Nike, Adidas, Jordan, Puma—and their cultural impact. These brands revolutionized footwear with high-tops, bright colors, and sporty aesthetics. Translating that iconic look into a soft crochet version has become a major trend in handmade fashion.
Crafters often draw inspiration from:
- Classic Chuck Taylors
- Retro Air Jordans
- Modern sneaker trends with vibrant colors and futuristic silhouettes
Some even go a step further and mimic actual team shoes to match baby’s nursery or family’s favorite sport.
Crochet turns these usually mass-produced designs into cozy, customizable versions fit for tiny toes—and the result is nothing short of delightful.
Skill Level and Learning Curve
Crochet baby basketball shoes are a beginner-to-intermediate project. While you don’t need to be an expert, you should feel comfortable with:
- Basic stitches (sc, hdc, dc)
- Increasing and decreasing
- Working in the round
- Joining yarn and changing colors
- Counting stitches accurately
If you’re brand new to crochet, you might want to start with a basic bootie or slipper before tackling a full sneaker style. That said, this guide will break things down thoroughly and provide visual ideas that even motivated beginners can follow.
Materials and Tools You’ll Need
Let’s break down what you’ll need before you get started:
Yarn:
- DK (Light #3) or worsted (Medium #4) weight yarn
- Choose soft, hypoallergenic fibers
- Cotton, acrylic, or blends are ideal
Hook:
- 3.5mm–4.5mm crochet hook
- Smaller hook for tighter stitches
- Match your hook size to your gauge and yarn weight
Notions and Tools:
- Yarn needle
- Stitch markers
- Scissors
- Buttons, felt patches, or embroidery thread (for details)
- Measuring tape
- Optional: Fabric glue, puff paint (for anti-slip soles), cardboard for structure
Tip: Choose high-contrast yarn colors so the shaping and details stand out clearly.
Choosing the Best Yarn for Baby Shoes
When choosing yarn, think about both texture and structure.
Cotton Yarn:
Pros: Breathable, firm, great stitch definition
Cons: Can stretch out, not as warm
Acrylic Yarn:
Pros: Soft, affordable, washable
Cons: May pill over time
Blended Yarn (cotton-acrylic):
Pros: Best of both worlds; gentle and structured
Cons: Slightly more expensive
Avoid yarns that are fuzzy, slippery, or itchy. Look for smooth finishes that hold shape well. You want your shoes to feel comfortable on a baby’s feet and stay looking fresh after multiple wears and washes.
Choosing the Right Colors and Patterns
Color plays a huge role in how sporty or playful your crochet baby shoes will appear.
Popular Color Themes:
- Classic Black + White (Converse inspired)
- Red + White (Air Jordan homage)
- Blue + Yellow (Team spirit)
- Grey + Neon Green (Modern baby fashion)
- Pink + White (Girly and sweet)
- Custom colors to match nursery themes
You can go monochrome, two-tone, striped, or even use variegated yarns for a unique look.
Understanding Sizing and Gauge for Baby Feet
Here’s a general guide to sizing:
| Age | Shoe Length | US Size |
|---|---|---|
| 0–3 mo | 3.5–3.75″ | 1 |
| 3–6 mo | 4–4.25″ | 2 |
| 6–12 mo | 4.5–5″ | 3 |
Use a baby foot chart or soft tape measure to verify measurements. Always make a gauge swatch before beginning your project.
Sample gauge (using sc with DK yarn and 4mm hook):
20 sc and 22 rows = 4″ x 4″
Essential Stitches and Techniques
You’ll use the following techniques:
- Chain (ch)
- Slip stitch (sl st)
- Single crochet (sc)
- Half double crochet (hdc)
- Double crochet (dc)
- Back loop only (BLO)
- Front post (fp) / back post (bp) for texture
- Working in rounds
- Fastening off and joining
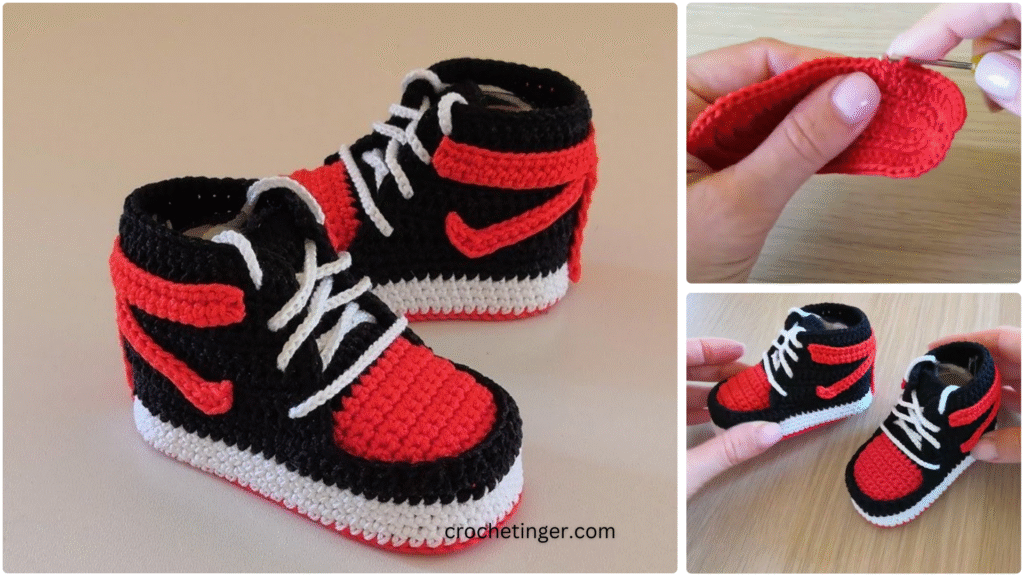
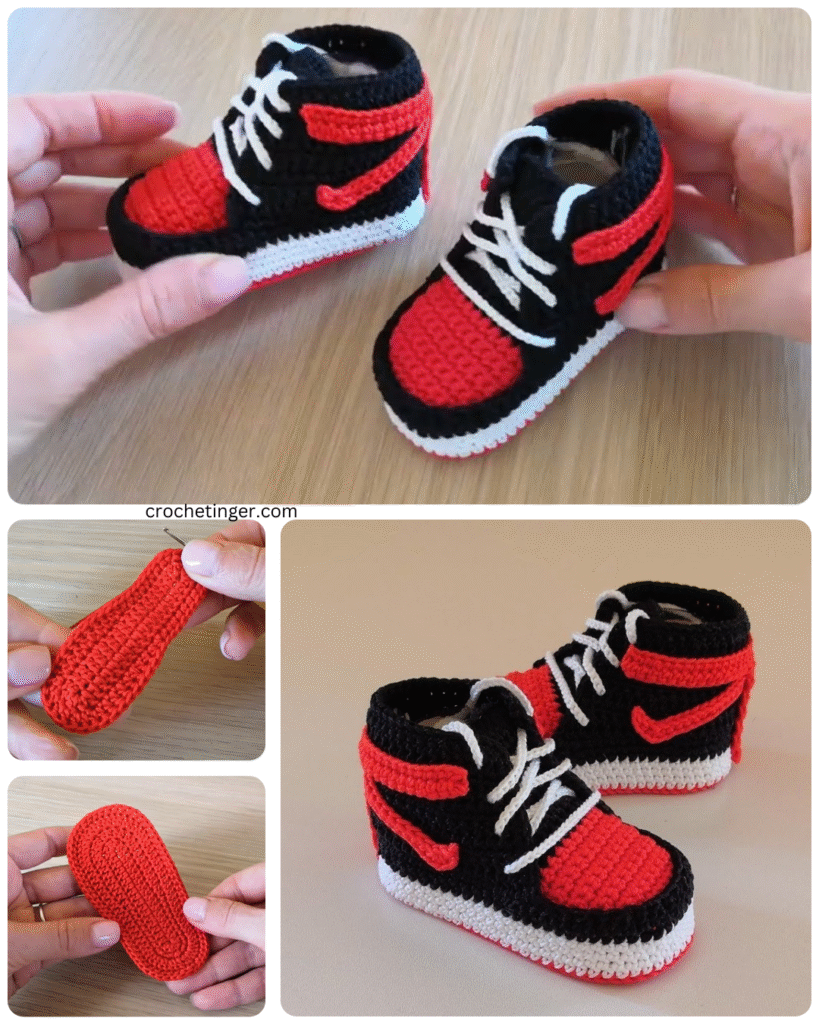
Step-by-Step Pattern for Crochet Baby Basketball Shoes
Let’s get into the detailed pattern for making a pair of cute, high-top crochet baby basketball shoes. This pattern is beginner-friendly but offers enough complexity to keep experienced crocheters engaged. We’ll work in stages—starting with the sole, moving up to the body, toe cap, tongue, side panels, laces, and finishing details. All instructions use U.S. crochet terms.
Materials Recap
To start, gather the following materials:
- Yarn: DK or worsted weight in two or three complementary colors
- Crochet hook: 3.5mm (E) or 4mm (G)
- Yarn needle or tapestry needle
- Scissors
- Stitch markers (optional but helpful)
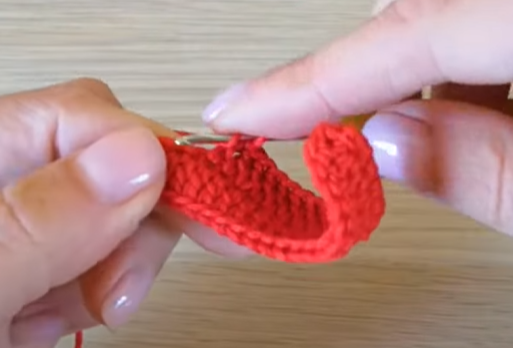
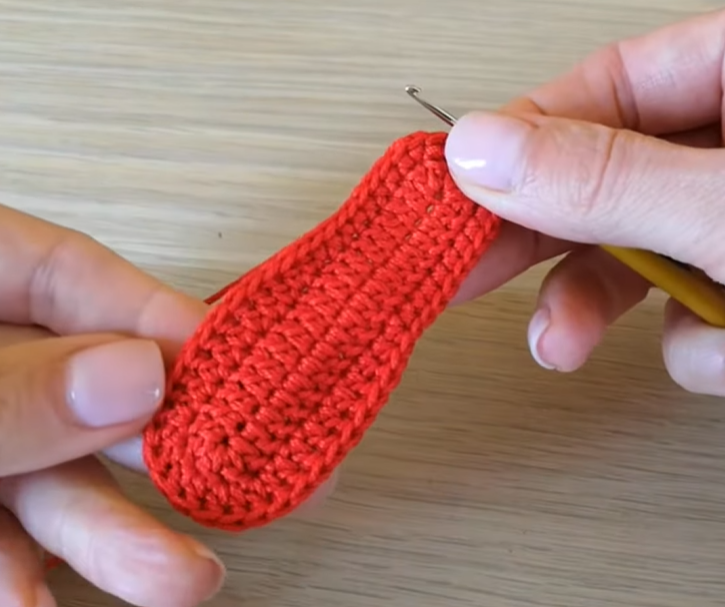
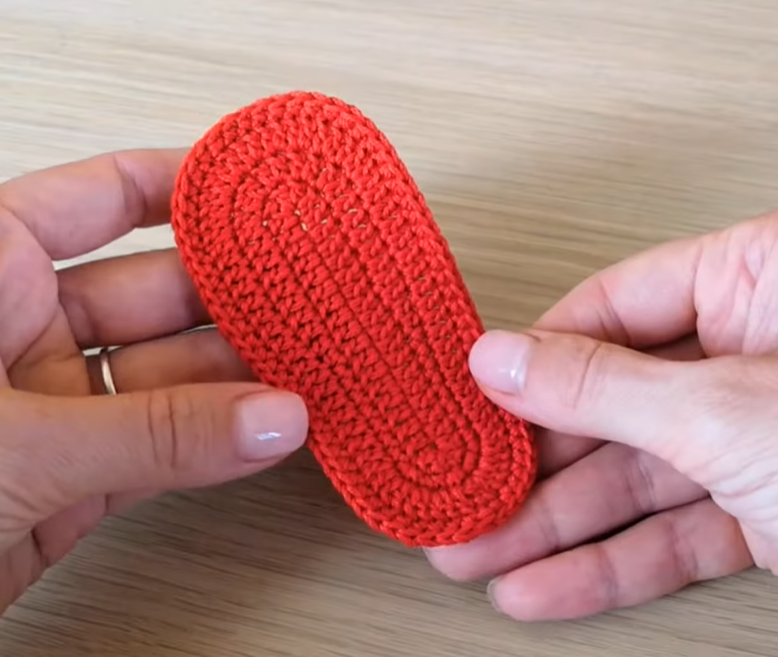
Sole (Make 2)
Start by chaining 11.
In Round 1, work 1 single crochet in the second chain from the hook, then single crochet in the next 7 chains. In the next chain, work 1 half double crochet. In the final chain, work 5 half double crochets to curve around the toe. Continue by working down the opposite side of the chain: half double crochet in the next stitch, single crochet in the next 7, and work 4 single crochets in the final chain. Join with a slip stitch. You should now have 28 stitches.
In Round 2, chain 1, then work 2 single crochets in the same stitch. Continue with 1 single crochet in the next 8 stitches, followed by 2 single crochets in each of the next 5 stitches. Work 1 single crochet in the next 8, then 2 single crochets in each of the last 4 stitches. Join with a slip stitch for a total of 38 stitches.
In Round 3, chain 1 and alternate 2 single crochets and 1 single crochet across the round, focusing your increases around the toe and heel areas to maintain a rounded sole shape. Join with a slip stitch and fasten off. Weave in all ends.
Upper Body
Join your chosen body color yarn at the back heel of the sole.
For Round 1, single crochet in the back loops only around the edge of the sole. This gives a defined edge and creates the base of the shoe’s body. Join with a slip stitch.
For Rounds 2 through 5, chain 1 and single crochet in each stitch around, joining at the end of each round. After four rounds, the walls of the shoe will be well defined.
For optional Rounds 6 through 8, you can switch to a contrasting color to add stylish accent stripes. Continue in single crochet or half double crochet for a different texture. Fasten off at the end of Round 8 and weave in any tails.
Toe Cap
Switch to white or another contrasting color to create the iconic sneaker toe look.
To start, join the yarn about 4 to 5 stitches off-center at the front of the shoe.
In Row 1, chain 1 and single crochet across 10 stitches centered on the front toe section.
For Rows 2 through 4, turn your work and single crochet across, decreasing one stitch at each end using sc2tog. This tapers the toe cap. Fasten off and leave a tail for sewing.
You can either stitch this piece flat or curve it gently while sewing it onto the shoe body to create a rounded sneaker toe.
Tongue
The tongue will go behind the toe cap and rest inside the upper body of the shoe.
Join yarn at the center of the shoe behind the toe cap.
In Row 1, chain 1 and single crochet in 10 stitches across the tongue area.
For Rows 2 through 6, turn and single crochet evenly across. Fasten off and leave a long tail to sew the tongue in place behind the toe cap.
You may adjust the tongue length for a sportier or more casual look.
Side Panels and Ankle Support
These additions give your shoe the signature high-top basketball shape.
To make the side flaps, join yarn at the midpoint along the shoe’s side.
In Row 1, single crochet in 8 stitches up the side toward the ankle opening, slightly above the tongue line. Chain 1 and turn.
Work Rows 2 through 5 with single crochet to form a neat rectangular flap. Fasten off. Repeat on the other side of the shoe.
To form the ankle collar, join yarn across the back of the heel and between the two flaps. Work 2 to 3 rows of single crochet. This gives a finished, sturdy edge. Fasten off and weave in all loose yarn ends.
Laces
You can crochet your own laces or substitute with ribbons.
To crochet the laces, chain 90 or more, depending on the size. Fasten off and weave in the ends. Thread the chain through the side flaps in a crisscross pattern. Tie a bow at the top.
If you prefer, use a soft satin ribbon or even thin cord to act as laces. Just make sure the material is baby-safe and securely tied.
Personalization and Embellishments
There are countless ways to personalize your baby basketball shoes. You can:
- Add felt stars, hearts, or tiny numbers on the side panels
- Embroider baby’s initials using a tapestry needle
- Use yarn in team colors to support your favorite sports team
- Add puff paint or grippy latex to the sole for traction
- Stitch a small logo or icon for added flair
Personalizing these shoes not only adds charm but also makes them perfect for baby gifts, especially for sports-loving families.
Coordinated Accessories
To elevate your baby shoe project into a complete set, consider creating matching accessories. Try pairing the shoes with:
- A crochet beanie in matching colors
- A striped baby bib with sneaker motifs
- A crochet blanket with small appliqué sneakers or stars
- A varsity-style crochet baby jacket
- A small sports-themed backpack for baby photoshoots
Sets like these make beautiful and unique handmade gifts that stand out at baby showers or in online marketplaces.
Styling Tips for Baby Outfits
These high-top shoes pair adorably with a variety of baby outfits. Try combining them with:
- Soft jogger pants and hoodie sets
- Cotton onesies in sports themes
- Denim overalls for a classic casual look
- Track-style baby suits
- Team jerseys or custom t-shirts
You can even design full photo-shoot outfits centered around the shoes, complete with props like plush basketballs or mini hoops.

Troubleshooting Common Problems
If the shoes feel too tight or too loose, consider adjusting your hook size. Going up or down one size can make a noticeable difference. You can also add or reduce rows to adjust for foot size.
If the toe cap bulges awkwardly, reduce the number of rows or try tapering more gradually. A neater decrease can help create a smoother finish.
If your laces seem too stiff, try using finer yarn, embroidery floss, or ribbon for a more flexible fit.
If the overall shape doesn’t resemble a sneaker, block the shoe gently using tissue or foam forms to mold it into the correct shape.
Care Instructions
To ensure the shoes stay in great condition:
- Hand wash using baby-safe detergent in lukewarm water
- Reshape and lay flat to dry
- Avoid wringing or heat drying
- Spot clean when possible
- Include a small care card when gifting or selling
Safety Guidelines
Always ensure:
- All yarn ends are tightly woven and secured
- Decorative elements are non-detachable and baby-safe
- Yarn is soft and hypoallergenic (look for OEKO-TEX certification)
- Soles are slip-resistant if the baby is standing or walking

Selling Your Crochet Baby Basketball Shoes
These shoes are a hit in online marketplaces and boutique shops. You can sell them on platforms like:
- Etsy
- Facebook Marketplace
- Instagram shops
- Local craft fairs
- Baby gift boutiques
They usually sell between $25 and $45 depending on design and accessories. Offering them as part of a coordinated set or gift bundle can raise their perceived value and appeal.
Add branding elements like care tags, logo labels, or themed packaging to increase professionalism.
Marketing and Branding
For maximum success when selling, take quality photos of your finished products using soft lighting and clean backgrounds. Include a mix of close-up shots, styled flat-lays, and worn looks (on dolls or gently posed babies).
Use product names like “Tiny All-Stars” or “Mini Hoopers” to make your shoes memorable.
Share progress photos, reels, and behind-the-scenes videos on platforms like Instagram, Pinterest, and TikTok. Ask customers to use a branded hashtag when sharing photos of their babies wearing your shoes.
Build seasonal collections—such as spring playoffs or winter warmers—with limited color options or themes to generate excitement and urgency.
Growing Your Crochet Business
To take your crochet baby shoe business further, you can:
- Calculate time and materials per pair for accurate pricing
- Streamline your pattern for faster replication
- Offer custom color choices in your listings
- Purchase yarn in bulk to reduce cost
- Add premium packaging like tissue, ribbon, or printed tags
- Encourage reviews and customer photo submissions
You may even consider turning this pattern into a digital PDF with diagrams and selling it online or including it as a bonus in a kit.

Engage with the Crochet Community
Join groups and forums where you can:
- Share photos of your work
- Learn from others
- Get feedback and encouragement
- Offer your pattern for free to build your brand
- Submit your designs to online crochet magazines
- Host workshops or record video tutorials
- Start a Crochet-Along featuring themed sneaker patterns
Engaging with other crocheters not only helps improve your skills but also helps build your reputation and visibility as a maker.
Video Tutorial:
Final Thoughts
Crocheting baby basketball shoes is an incredibly rewarding project. You’re not only creating a functional item but also infusing it with personality, style, and heart. Whether you’re making them for a baby shower gift, your little one, or to sell, these tiny high-tops bring joy, comfort, and undeniable cuteness.
Each stitch you place is part of a bigger picture—a handmade moment in a baby’s life story. From the moment they’re slipped onto tiny feet to the time they’re placed in a keepsake box, these shoes hold a special place.
So grab your yarn, find your hook, and start creating magic one stitch at a time.
You may be interested:


