
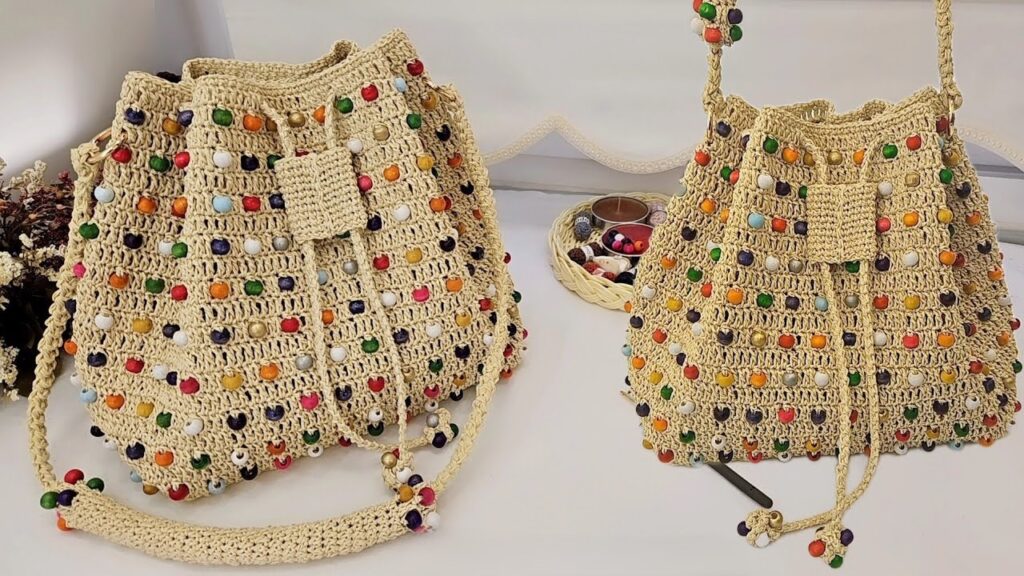
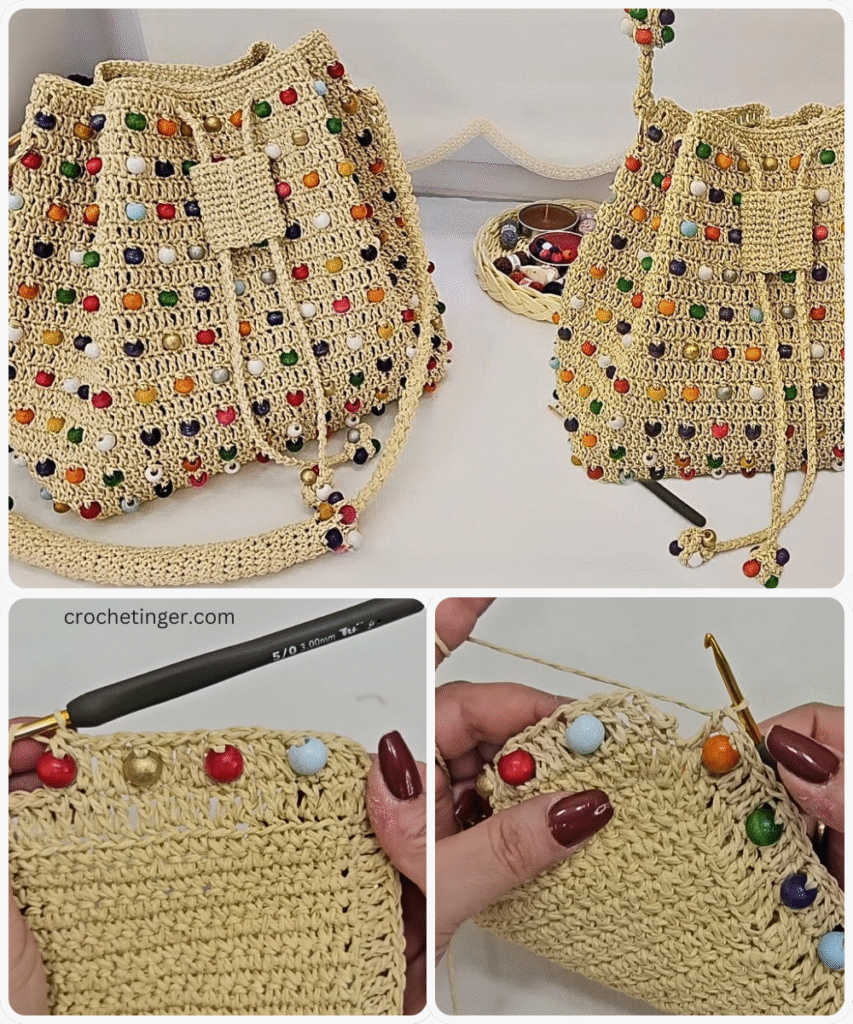
Crochet has always been more than just a hobby—it’s a creative escape that weaves together comfort, color, and charm. Among the many projects that you can craft with your crochet hook, the bucket bag is one of the most stylish and versatile accessories you can make. Add a handful of beads, and you elevate your project from handmade to boutique-worthy. The beaded bucket bag blends practicality with a splash of glamour, and the best part? It’s beginner-friendly and totally customizable.
In this comprehensive blog post, you’ll learn exactly how to make your own Easy Crochet Beaded Bucket Bag, even if you’re still new to crochet or have never worked with beads before. We’ll explore the stitches, materials, techniques, color options, bead placement strategies, and finishing touches. Whether you’re crafting this bag for yourself, as a gift, or to sell in your handmade shop, this step-by-step tutorial is designed to guide you from the first chain to the final flourish.
Let’s dive into the exciting world of crochet and create a show-stopping, functional accessory you’ll be proud to carry.
What Is a Crochet Beaded Bucket Bag?
A bucket bag is a drawstring-style handbag characterized by a round or oval bottom and a deep, vertical body. It often has a fabric or crocheted strap and may include an inner lining. The bucket shape gives it enough structure and space for everyday use without being bulky. When made with crochet and embellished with beads, it becomes a fashion-forward statement piece.
Crochet beaded bags are a beautiful blend of craft and couture. Beads add texture, sparkle, and dimension to your crochet work. Plus, they allow you to express your personal style—whether that’s minimalist and elegant or bold and bohemian.
Who Can Make This Bag?
This project is perfect for:
- Beginners who know basic stitches (chain, single crochet, slip stitch, etc.)
- Intermediate crocheters looking to explore beadwork
- Advanced crafters seeking a stylish, quick project
- Crafters selling at markets who want to create unique, high-value items
If you’ve never worked with beads in crochet before, don’t worry! We’ll cover all the techniques you need.

Tools and Materials Needed
Before you start your project, it’s important to gather the right tools and materials. Choosing quality materials will make your project easier and your bag longer lasting.
Yarn
Choose a yarn that is smooth, durable, and not too stretchy. Cotton yarn is an excellent choice because of its structure and stitch definition.
Recommended:
- Worsted weight (medium 4) mercerized cotton yarn
- Yardage: Approximately 400–500 yards depending on bag size
Avoid fuzzy or textured yarns, as these make it harder to insert beads.
Hook
Use a hook size that matches your yarn but gives you a tight, dense fabric—this helps your bag hold its shape.
Suggested size:
- 4.0 mm (G-6) or 4.5 mm (7)

Beads
Beads add a touch of elegance and texture to your bag. Choose ones that complement your yarn and are the right size to fit your crochet hook and yarn.
Recommended:
- 6/0 seed beads or small pony beads
- Quantity: 150–250 beads, depending on pattern and spacing
- Hole size: Must fit your yarn or be pre-threaded
Other Tools
- Tapestry needle (for weaving in ends)
- Scissors
- Beading needle or dental floss (for threading beads)
- Stitch markers
- Optional: Fabric lining, magnetic snap, drawstring stopper
Planning Your Design and Bead Layout
Before you begin crocheting, take time to visualize your bucket bag. Do you want a solid color or a multicolor design? Will you add beads in rows, spirals, or clusters?
Shape and Size
Standard size:
- Base diameter: 6–8 inches
- Height: 9–11 inches
- Strap: 30–45 inches (adjustable or fixed)
Bead Placement Options
- All-over beading: Beads spaced evenly throughout the entire bag
- Bottom-to-top fade: More beads at the base, fewer at the top
- Patterned beads: Create simple shapes (diamonds, hearts, spirals) with beads
- Beaded drawstring: Add a line of beads around the drawstring area only
Use graph paper to sketch your bead pattern if needed. Planning ahead makes for a polished final product.
Step-by-Step Pattern: Crochet Beaded Bucket Bag
This pattern is written in US terms.
Abbreviations
- ch = chain
- sc = single crochet
- sl st = slip stitch
- st(s) = stitch(es)
- inc = increase (2 sc in one stitch)
- rep = repeat
- rnd = round
- ( ) = repeat instructions within parentheses
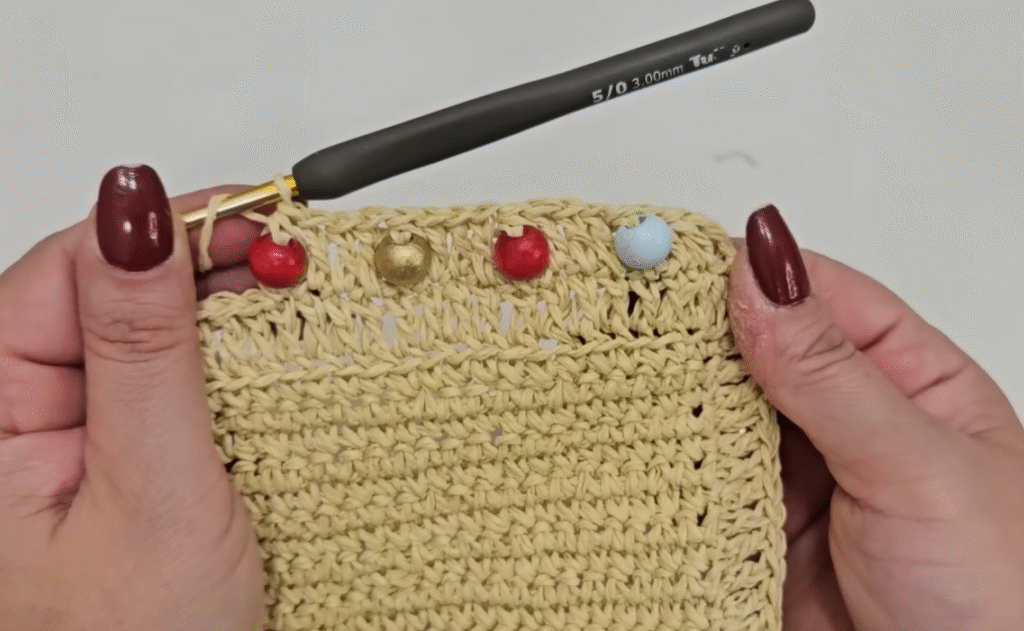
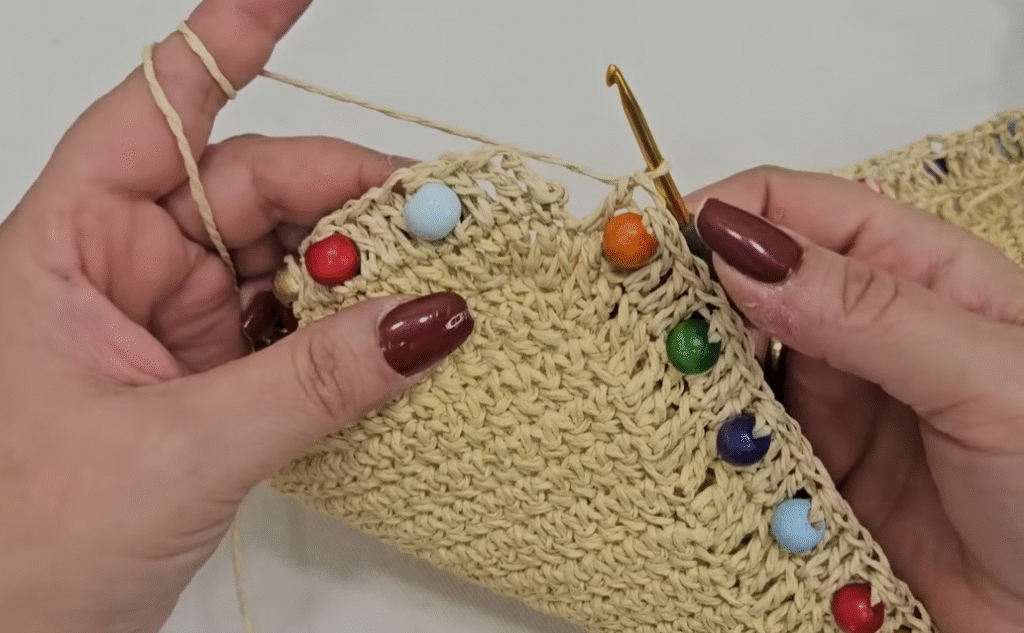
Step 1: Thread Your Beads
Before you begin crocheting, thread your beads onto your yarn. Estimate the number of beads you’ll need per round and add a few extra.
To thread:
- Use a beading needle or
- Fold a piece of fine dental floss in half, insert yarn into the loop, and string beads onto floss, sliding them onto yarn
Slide the beads down the yarn, away from your working end.
Step 2: Create the Base (Flat Circle)
This forms the sturdy bottom of your bucket bag.
- Make a magic ring or ch 4 and sl st to form a ring.
- Rnd 1: Ch 1, 6 sc into ring. (6 sts)
- Rnd 2: 2 sc in each st around. (12 sts)
- Rnd 3: (Sc in next st, 2 sc in next) around. (18 sts)
- Rnd 4: (Sc in next 2 sts, 2 sc in next) around. (24 sts)
- Continue increasing 6 sts per round until the base measures your desired diameter (typically 7–8 rounds total).
Do not fasten off.
Step 3: Shape the Sides
Begin working the body of the bag in spiral or joined rounds.
- Rnd 1 (side): Sc in back loop only around. (This helps define the edge.)
- Rnds 2–4: Sc in each st around.
- Rnd 5: Start placing beads. Slide one bead close to your hook, sc into next stitch, trapping the bead. Repeat every 4–5 stitches.
- Continue working sc around, adding beads per your design.
Work until the piece measures 8–10 inches in height.
Tips:
- Push beads to the front as you crochet.
- Keep tension even for a smooth fabric.
Step 4: Drawstring Eyelets
To create holes for your drawstring:
- Rnd X: (Sc in next 3 sts, ch 1, skip 1 st) around. This creates small eyelets.
- Rnd X+1: Sc in each stitch and chain space around.
Step 5: Top Edge Finishing
Work 2–3 rounds of regular sc or a crab stitch (reverse sc) for a clean, structured edge.
Fasten off and weave in all ends securely.
Step 6: Make the Drawstring
Option 1: Crochet Chain Cord
- Ch 100–120 (or desired length)
- Optional: Thread beads onto cord as you go
- Weave through eyelets and tie at the front
Option 2: I-Cord or Braided Cord
- Use 2 or 3 strands of yarn and braid
- Add beads to each end
- Knot securely

Step 7: Add a Strap
The bag works best with one long shoulder strap or two shorter ones.
Crochet Strap
- Ch desired length (e.g., 90–110 chains)
- Work 2–3 rows of sc
- Sew securely to both sides of bag
Optional: Leather or Fabric Strap
Sew or rivet pre-made straps for a boutique look.
Optional Step: Line Your Bag
If you plan to carry small items or want extra durability, consider lining your bucket bag.
- Cut fabric circle and rectangle (same size as your crochet base and body)
- Sew side seam and bottom seam
- Insert into bag and whip stitch to top edge
- Optional: Add magnetic snap or zipper
Style Tips and Variations
Now that you’ve made your bag, here’s how to make it uniquely yours.
- Use metallic yarn and gold beads for evening glam
- Try stripes or color blocking for a boho look
- Use wooden or pearl beads for earthy charm
- Add tassels, fringe, or charms to the drawstring
Care Instructions
Your crochet beaded bucket bag will last a long time with proper care.
- Spot clean with a damp cloth
- Avoid machine washing if beaded
- Store flat or hanging to avoid creasing
- Keep away from sharp objects to prevent snagging
Video Tutorial:
Final Thoughts
Crocheting a beaded bucket bag is more than just a weekend craft—it’s a joyful journey into design, function, and personal expression. Whether you’re dressing up a simple outfit or carrying it on vacation, your handmade bag will always be in style. Best of all, you’ve created something truly original.
From choosing your colors and beads to mastering every stitch, this project is a perfect example of how accessible yet fulfilling crochet can be. With the steps and tips in this guide, you’re fully equipped to make a beautiful, durable, and fashionable beaded bucket bag that turns heads and sparks conversations.
So grab your hook, pour a cup of tea, and let those beads dance on your yarn. You’re about to make something beautiful.
Happy hooking!
You may be interested:
- Crochet Lace Square Motif: A Complete Step-by-Step Guide
- Crochet Coaster Motif: A Step-by-Step Guide to Creating Beautiful Coasters
- How to Crochet a Charming Daisy Motif: A Step-by-Step Pattern
- How to Crochet a Simple & Easy Crochet Flower | Free pattern for Absolute Beginners


