

If there’s one motif in crochet that never goes out of style, it’s the heart. A universal symbol of love, care, and warmth, the heart shape is a beloved choice in everything from Valentine’s Day décor to heartfelt handmade gifts. One of the most charming ways to incorporate this symbol into your crochet creations is through a Crochet Hearts Border. This sweet and versatile edging can be added to scarves, blankets, baby clothes, table runners, greeting cards, picture frames, and so much more. Whether you’re a beginner or an experienced crocheter, learning to create a hearts border will add emotional value and elegance to your handmade items.
In this blog, we will take a deep dive into crafting the perfect crochet hearts border from start to finish. We’ll explore its origins and emotional symbolism, step-by-step instructions, design variations, useful project applications, styling ideas, yarn and hook choices, troubleshooting tips, and advanced modifications. By the end of this guide, you’ll not only be able to crochet a hearts border—you’ll be empowered to customize it and apply it across multiple projects. Let’s embark on this lovely journey together.

Why the Crochet Hearts Border is So Loved in the Crochet Community
The heart is a symbol that transcends language. It represents affection, compassion, memory, warmth, and gratitude. It also carries strong visual appeal with its recognizable curves and symmetrical beauty. In crochet, integrating hearts adds not only aesthetic value but also emotional resonance.
A hearts border is universally adaptable. It’s perfect for enhancing:
- Baby blankets
- Greeting cards
- Gift wraps
- Romantic gifts
- Journals and notebooks
- Garments
- Towels
- Napkins
- Pillowcases
- Wall hangings
The best part? The basic pattern for a crochet hearts border is simple, repetitive, and flexible. You can adjust it to suit your skill level and desired size or thickness. It can be made as delicate as lace or as bold and chunky as your project requires.
Choosing the Right Materials for Your Crochet Hearts Border
Before starting, it’s important to gather the right materials. The beauty of a border pattern is that it requires minimal supplies and is a great way to use leftover yarn.
1. Yarn
Choose a yarn that matches or complements your main project. For a soft and dainty hearts border, cotton yarn is often the best choice. Acrylic yarn works well too, especially if you want something machine-washable. For thicker or chunkier borders, bulky or worsted yarns add dimension and visibility to the heart shape.
Recommended yarn weights:
- Fine or sport weight for lace-like hearts
- DK or worsted for medium-thick edging
- Bulky yarn for big, bold hearts
2. Hook
Match the hook size to your yarn weight and the desired texture. For soft, lacy hearts, go up a size. For tighter, more defined hearts, go down a size.
Example guide:
- Fingering yarn: 2.5mm – 3.0mm hook
- DK yarn: 4.0mm hook
- Worsted yarn: 5.0mm – 6.0mm hook
3. Notions
- Scissors
- Tapestry needle
- Stitch markers (optional but helpful)
- Blocking mat and pins (if you plan to block your finished work)
4. Pattern Knowledge
You’ll want to be familiar with:
- Chain (ch)
- Slip stitch (sl st)
- Single crochet (sc)
- Half double crochet (hdc)
- Double crochet (dc)
- Treble crochet (tr) for more elaborate hearts
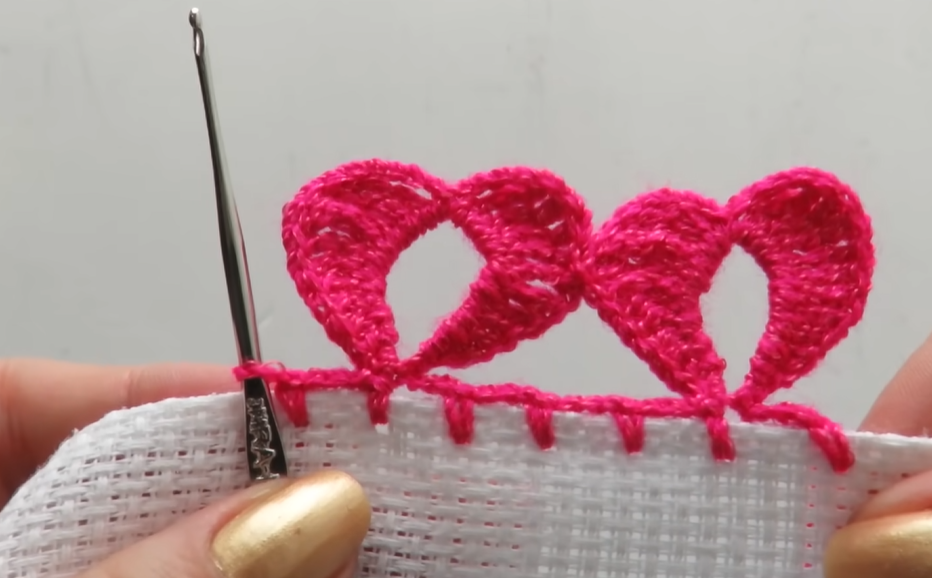
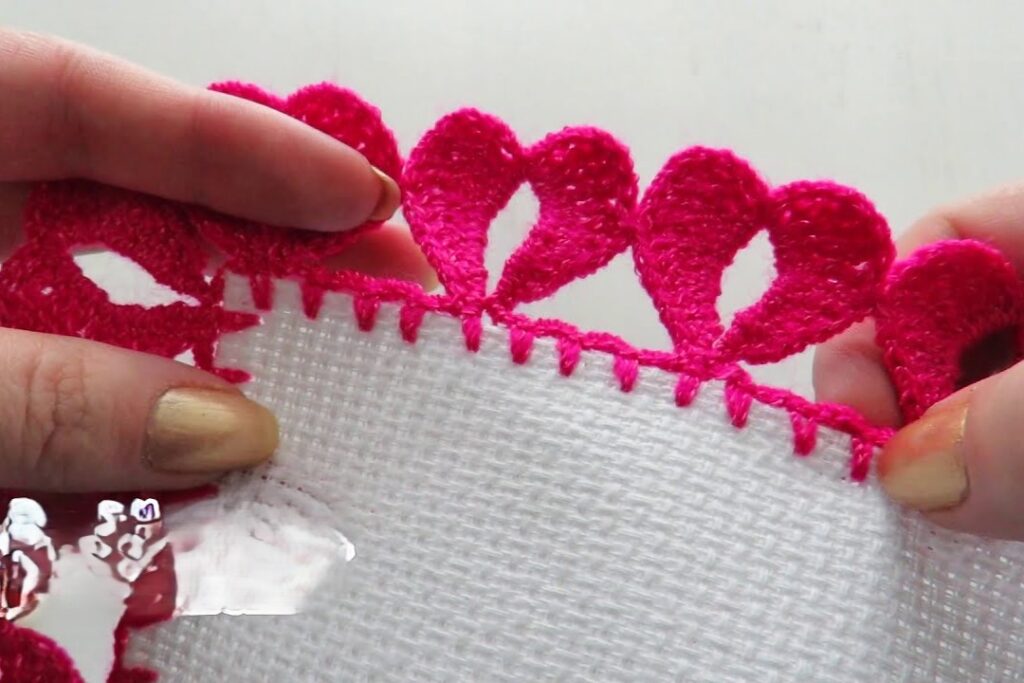
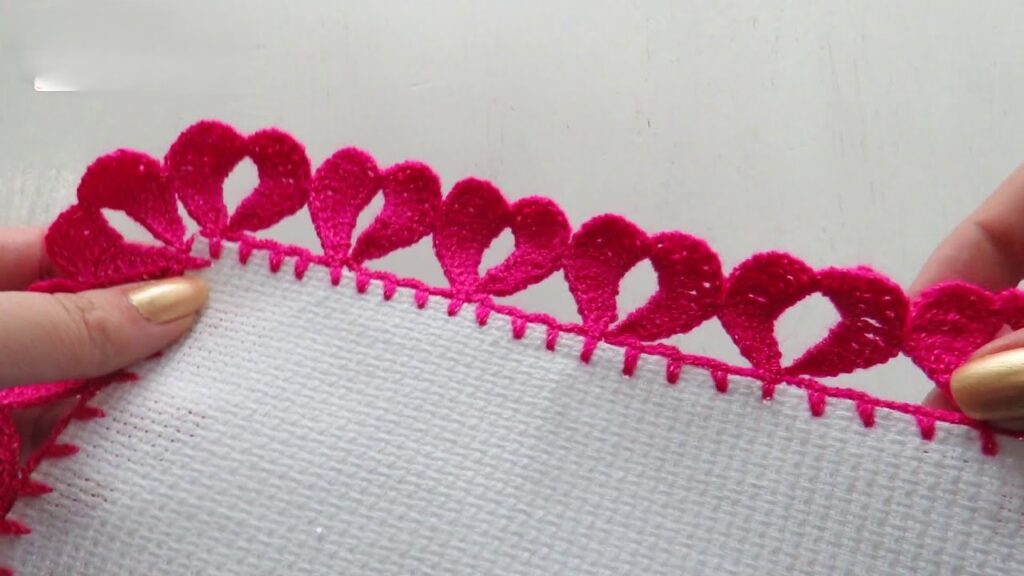
Step-by-Step Tutorial: Basic Crochet Hearts Border
Let’s start with a basic version that repeats small hearts evenly spaced along the edge of your fabric.
Step 1: Foundation Row
If you’re attaching the hearts directly to a project (like a blanket), begin by crocheting a simple border with single crochets all around the edge of the project to create a foundation. If you’re making the hearts border separately, chain in multiples of 6 plus 1 for turning.
Example: Chain 25 (24 + 1)
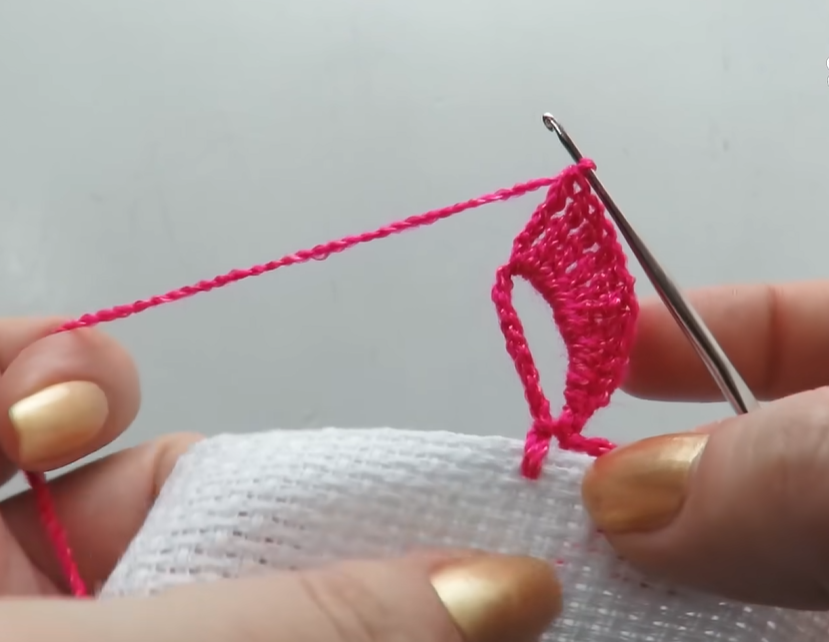
Step 2: First Heart Setup
Insert your hook into the second chain from the hook, then:
- Slip stitch into the chain
- Chain 2 (this is your base for the heart)
- Into the same stitch, work:
- 3 double crochets
- 3 treble crochets
- Chain 1
- 3 treble crochets
- 3 double crochets
- Chain 2 and slip stitch back into the same stitch
You now have a full heart shape anchored in a single chain space.
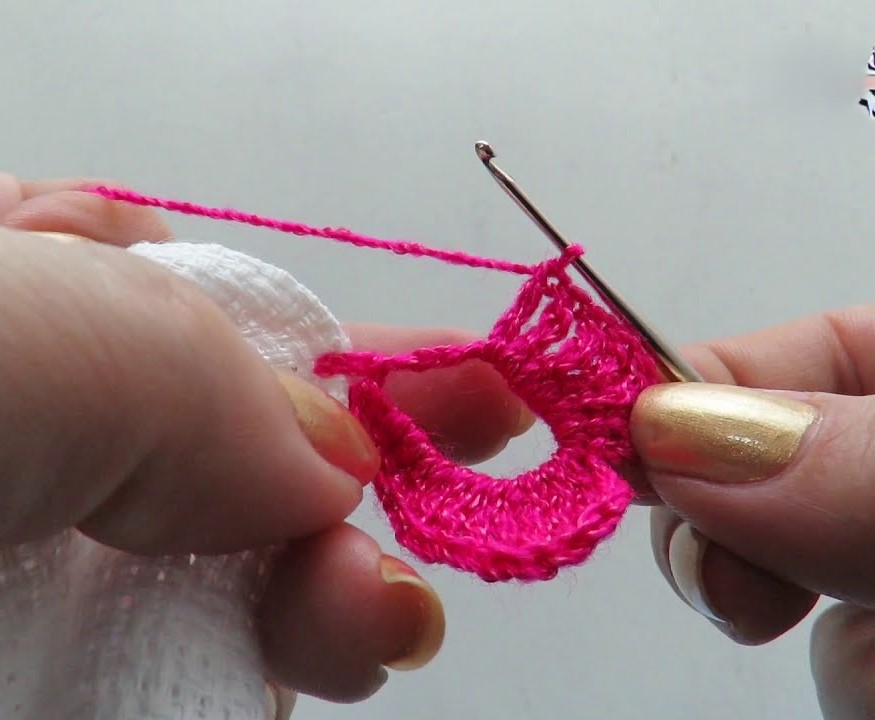
Step 3: Spacing Between Hearts
Chain 3 to skip and give space between each heart, then begin the next heart in the 4th chain.
Repeat the same sequence.
Step 4: Continue Across
Repeat the heart sequence across the row or around the fabric edge, spacing each heart with chains as necessary.
Step 5: Finishing
Once the border is complete, fasten off and weave in ends. You can block the hearts to shape them better.
Adding the Hearts Border to Fabric Edges
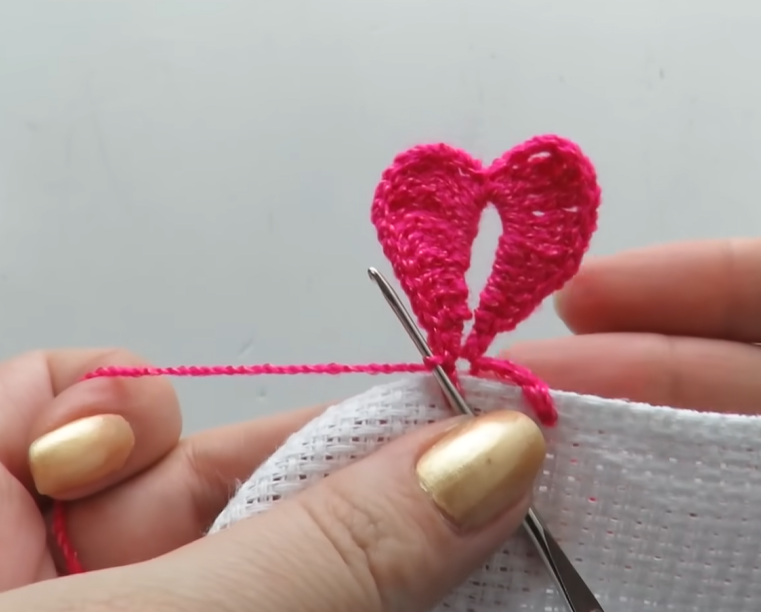
If you’re crocheting directly onto the edge of fabric like a baby blanket or towel, first make a foundation border using single crochets. Then work your hearts border into that foundation.
Creative Variations of the Hearts Border Pattern
Let’s look at creative variations and design upgrades to customize your hearts border.
1. Floating Hearts with Chains
Create hearts that look like they’re “floating” along a chain rope.
How:
- Work a long chain
- At intervals, add mini heart motifs using magic rings
- This variation is great for delicate scarves or bookmarks
2. Linked Hearts Border
Each heart shares a side with the next, forming a continuous chain of connected hearts.
How:
- When finishing one heart, begin the next in the final stitch of the previous heart
- Great for a bolder visual effect, especially on garments and shawls
3. Layered Double Hearts
This style gives a 3D effect by layering smaller hearts on top of larger ones.
How:
- Crochet small hearts separately and sew or attach to larger heart base
- Ideal for mixed-media projects like wall art, bookmarks, or journal covers
Using Color to Enhance Your Crochet Hearts Border
Color is a powerful tool when designing your hearts border. Here are some suggestions:
1. Ombre or Gradient Hearts
Use yarn cakes or gradient yarns to create a shifting color palette.
2. Multi-Colored Borders
Use a different color for each heart. This is especially great for children’s items or seasonal décor.
3. Two-Tone Hearts
Use one color for the heart and another for the border stitches (outline the heart with slip stitches in another color).
4. Yarn with Texture or Shine
Metallic yarns, boucle, or velvet yarns add unique texture to your border.
Creative Project Ideas Featuring the Hearts Border
Here’s how you can creatively incorporate this border:
1. Baby Blankets
Add the hearts border all around the edge. Choose soft pastel colors like pink, mint, or lavender.
2. Scarves and Cowls
A hearts border adds charm to neutral scarves. Great for gifting!
3. Cardigans and Sweaters
Edge the collar or sleeves with the hearts motif for a romantic detail.
4. Greeting Cards
Use crochet thread and tiny hooks to create mini hearts border as trim for cards or gift tags.
5. Gift Wraps
Add hearts borders to paper wraps, jars, or fabric gift bags.
6. Wall Art
Glue or stitch your hearts border onto a canvas or embroidery hoop for DIY art.
7. Photo Frames
Attach crochet hearts around a wooden or cardboard frame.
8. Placemats and Coasters
Create full rounds or squares with hearts edges for kitchen or dining aesthetics.
Troubleshooting Common Mistakes
Crochet borders may seem straightforward, but the following are common errors:
1. Irregular Heart Shapes
Fix: Make sure your tension is consistent, and that you follow the stitch counts precisely.
2. Curling Borders
Fix: Add blocking to help flatten the border. You may also need to adjust your foundation stitches.
3. Uneven Spacing
Fix: Use stitch markers to plan out where each heart will go, especially if going around corners.
4. Edges Not Lining Up with Project
Fix: Calculate the stitch count needed before starting to ensure the border evenly fits.
Advanced Modifications for Experienced Crocheters
If you’re comfortable with the basics, explore these advanced ideas:
- Filet crochet hearts pattern for lace
- Incorporating the hearts border into tapestry crochet
- 3D pop-up hearts using stuffed motifs
- Creating a full heart mandala border
- Overlay mosaic crochet technique for graphic hearts
Monetizing Your Crochet Hearts Border Content
Once you’ve mastered the pattern, you can use it to create digital content, handmade items for sale, or tutorials. Here’s how to align your blog or website with AdSense:
1. Original Content Only
Make sure every part of your blog is unique and well-written, just like this one. Avoid duplicating others’ patterns or photos.
2. Visual Content
Add your own process photos, step-by-step visuals, and videos if possible. Visuals increase time spent on your site.
3. Clear Navigation
Organize your blog so users can easily find related crochet tutorials.
4. Ad Placement
Keep ads unobtrusive. Place them between sections but never within pattern code.
5. Mobile Optimization
Ensure your blog is responsive and mobile-friendly.
Video Tutorial:
Conclusion: A Border You’ll Always Return To
The Crochet Hearts Border is more than just an edging. It’s a statement. It communicates affection, warmth, and personality in every stitch. Whether you use it on a heartfelt baby blanket or a wedding keepsake, it leaves a lasting impression. The best part is that it can grow with you—from beginner patterns to elaborate motifs as your skills develop.
So pick up your hook, grab your favorite yarn, and start creating borders that will bring joy to others. And once you’ve finished, don’t forget to share your creation on social media or your crochet blog—because love is even more beautiful when shared.
You may be interested:
- Master the Art of the Lace Flower Crochet Stitch
- Easy Knitted Slipper Socks You Can Make
- How to Crochet a Charming Daisy Motif: A Step-by-Step Pattern
- Crochet Lace Waves Motif


