
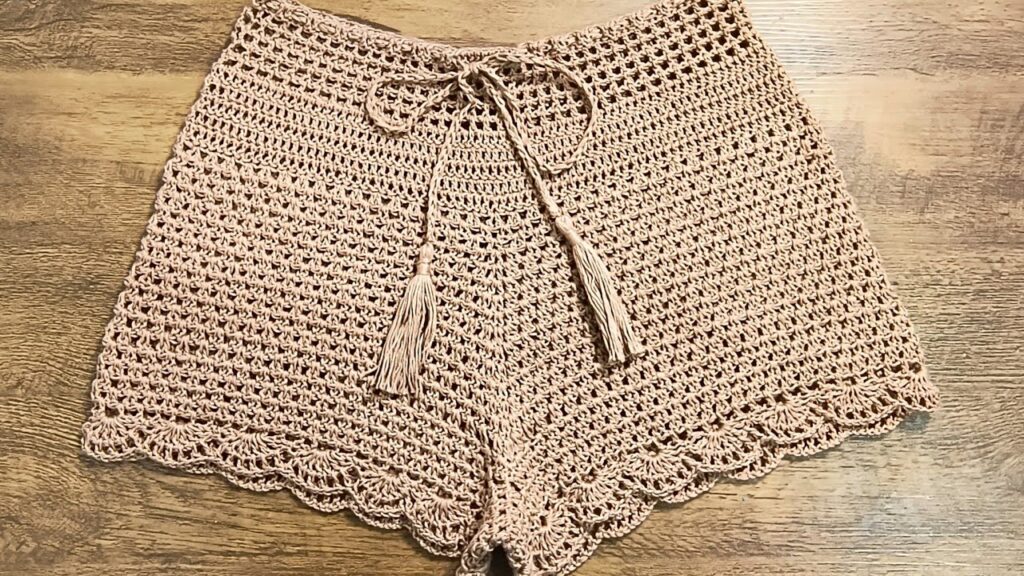
Crocheting isn’t just for cozy scarves and winter hats anymore. In recent years, the craft has expanded far beyond seasonal accessories into the world of fashion-forward, year-round wardrobe staples. One shining example? Crochet shorts — the stylish, comfortable, and surprisingly easy-to-make piece that is dominating handmade fashion circles.
These shorts are perfect for warm summer days, lounging at home, or layering over tights during cooler months. They’re customizable, breathable, and completely one-of-a-kind. Whether you’re new to crochet or a seasoned fiber artist, this project offers a fun challenge with stunning results.
This detailed guide is designed to walk you through the entire process of making your very own easy crochet shorts. We’ll cover everything from selecting yarn and taking measurements to constructing the perfect fit and adding stylish finishing touches. Whether you’re crafting for yourself, making a gift, or designing for a small handmade shop, these crochet shorts will become one of your go-to pieces.
Why Make Your Own Crochet Shorts?
Before diving into the technical details, let’s talk about why you might want to make your own shorts in the first place.
1. Complete Creative Control
Making your own shorts allows you to control every detail: color, stitch pattern, texture, and sizing. Want boho-style cotton lace in bright coral? You’ve got it. Prefer a neutral tone in a dense, modern stitch? No problem. The design is entirely up to you.
2. Sustainable Fashion
In a world increasingly aware of fast fashion’s environmental toll, handmade clothing represents a sustainable alternative. You choose the fibers, reduce waste, and make something that lasts.
3. Skill Development
Working on wearable crochet items like shorts helps develop advanced shaping skills such as increases, decreases, joining, and seaming. It’s a great way to step up your crochet game.
4. Unique Wardrobe Addition
Let’s face it: store-bought clothes can’t hold a candle to custom-made garments. These shorts are a true statement piece — no one else will have a pair quite like yours.
Now that you’re inspired, let’s get started with what you’ll need to bring your shorts to life.
Materials You’ll Need
Like any good crochet project, starting with the right materials will make all the difference in quality and comfort. Here’s what you’ll need:
Yarn
The yarn you choose is crucial for the look, drape, and wearability of your crochet shorts.
- Cotton yarn: Soft, breathable, and perfect for summer.
- Bamboo blends: Lightweight and excellent for draping.
- Acrylic blends: Affordable and durable, good for colder months.
- Elasticated yarn (optional): Adds stretch for a more fitted design.
Weight recommendations:
- DK (Lightweight, Category 3) for light, summer-ready shorts.
- Worsted (Category 4) for denser, cooler-season pieces.
Yarn quantity will vary depending on size and style. For an average adult pair of shorts in DK yarn, 400–600 yards should be sufficient.
Crochet Hook
Use a hook size that works well with your yarn and tension. You want a stitch that’s firm enough for modesty but not too stiff.
- For DK yarn: 4.0 mm (G) to 4.5 mm (7)
- For Worsted yarn: 5.0 mm (H) to 5.5 mm (I)
Always do a gauge swatch before starting to ensure the final shorts fit properly.
Notions
- Scissors
- Measuring tape
- Stitch markers
- Yarn needle (for weaving in ends)
- Elastic waistband (optional, for extra comfort)
- Safety pins or clips (for pinning sections before sewing)

Taking Accurate Body Measurements
The key to making comfortable and flattering crochet shorts lies in accurate measurements. Grab your measuring tape and record the following:
- Waist: Measure around your natural waistline.
- Hip: Measure the widest part of your hips.
- Rise: From the front waistline, through the legs, to the back waistline.
- Thigh circumference: Around the thickest part of your thigh.
- Inseam: From the crotch down to your desired short length.
- Outseam: From the waist to the desired short length on the outer leg.
Once you have these numbers, you’ll be able to construct a pair of shorts that fit you perfectly.
Understanding the Structure of Crochet Shorts
To better follow the tutorial, it helps to visualize how crochet shorts are constructed. There are a few popular methods:
Method 1: Two Panels
- Make two identical rectangles (or slightly shaped panels) for the front and back.
- Sew them together at the sides and crotch.
- Add a waistband and leg finishing.
Method 2: Circular (Top-Down)
- Work in the round from the waistband downward.
- Increase for hips and divide for leg holes.
- Crochet each leg separately.
Method 3: Granny Square Design
- Create granny squares and assemble them into shorts using a patchwork layout.
- Add edging and waistband for fit.
We’ll focus on the top-down circular method, which is the easiest for adjusting fit and provides a seamless look.
Pattern: Easy Crochet Shorts (Top-Down Method)
This pattern is a size-inclusive, adjustable guide. We’ll provide a medium-size base and explain how to customize it as needed.
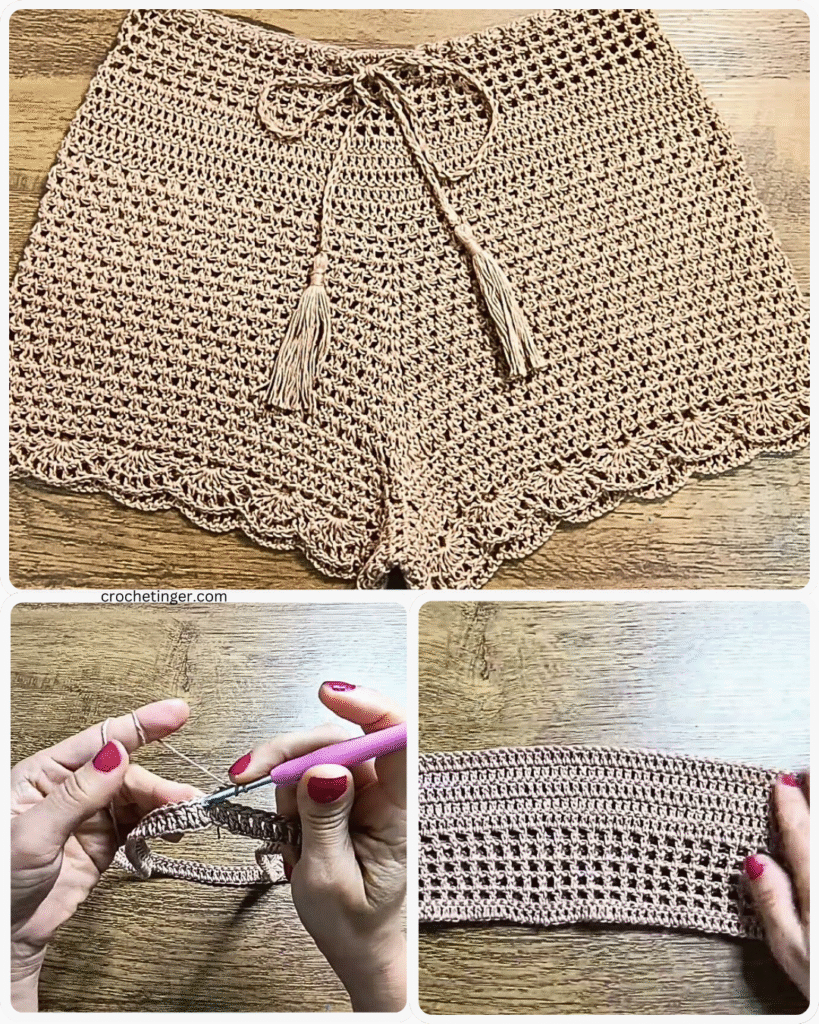
Step 1: Waistband
Start by creating the waistband, which can be elasticized or simply crocheted with ribbing.
Option A: Ribbed Waistband
- Ch 12 (or desired waistband height)
- Row 1: Sc in second ch from hook and across. (11 sts)
- Row 2–[Length]: Ch 1, turn. Sc in BLO across.
- Repeat until the band stretches comfortably around your waist.
- Sl st to join ends and form a ring.
- Do not fasten off. Rotate to work into the long edge.
Step 2: Body of the Shorts
You’ll now work in the round from the waistband down.
- Round 1: Ch 1. Work sc or hdc evenly around the waistband’s edge. Place stitch markers at the sides (these will align with your hips).
- Round 2–5: Continue working in your stitch of choice. You can use:
- Hdc for a dense but slightly stretchy texture.
- Mesh stitch (dc, ch 1, skip 1) for an airy, lacy look.
- Increase Rounds: Around the hip area, add a few stitches at the side markers.
- Work until the rise is long enough for your body.
Step 3: Separate for Legs
Once your body section is complete:
- Count total stitches and divide in half.
- Use stitch markers to separate front and back.
- Join yarn to one side and begin working leg rounds.
- Work in the round for each leg separately.
- Continue until the leg reaches desired length.
- Add decreases toward the bottom for a tapered fit (optional).
Step 4: Finishing Touches
- Edging: Add a row of reverse sc (crab stitch) or picots to the leg edges for a cute finish.
- Waistband insert: Sew in a soft elastic band for better fit.
- Drawstring: Chain a long cord and weave it through the waistband.
Crochet Stitch Ideas for Shorts
Different stitches create different effects. Here are a few to experiment with:
- Shell Stitch: Feminine and decorative.
- Moss Stitch: Dense yet breathable.
- V-Stitch: Fast and lacy.
- Granny Stitch: Vintage and quirky.
Combining stitch textures (e.g., ribbed waistband + mesh body + solid trim) adds visual interest and structure.

Customization Ideas
Here are ways to make your crochet shorts uniquely yours:
- Stripes or color blocking
- Pockets (crochet small squares and sew on)
- Lace side panels
- Flared or ruffled hems
- Matching crop top or bralette
- Tassels or fringe on the hem
Crochet is wonderfully versatile, so let your imagination run wild.
Troubleshooting and Tips
Even the most experienced crocheters run into issues. Here’s how to tackle some common ones:
Shorts too baggy?
- Use smaller hook.
- Use stiffer yarn.
- Reduce increases around hips.
Shorts too tight?
- Add more stitches in increase rounds.
- Use stretchier yarn.
- Add a gusset at the crotch.
Uneven leg openings?
- Count stitches to match both legs.
- Use stitch markers to track decreases.
- Block evenly before finishing.
Curling waistband?
- Add more ribbing rows.
- Weave in elastic.
- Use slip stitch edging for structure.
Care Instructions for Crochet Shorts
To ensure your crochet shorts last, follow these care tips:
- Hand wash in cool water with gentle detergent.
- Lay flat to dry to maintain shape.
- Avoid bleach or harsh chemicals.
- Block gently to reshape if needed.
- Store folded, not hung, to prevent stretching.

Style Guide: How to Wear Crochet Shorts Year-Round
Crochet shorts aren’t just for summer. Here’s how to rock them in any season:
Summer
- Pair with a crop top or bikini.
- Add sandals and a sunhat.
- Choose open stitches for breathability.
Spring
- Layer over tights with sneakers.
- Add a long-sleeve tee or lightweight jacket.
- Use pastel shades for a fresh look.
Fall
- Match with chunky sweaters and boots.
- Opt for denser yarns and longer inseams.
Winter
- Use wool blends and fleece-lined leggings.
- Wear under long coats or cardigans.
Selling Your Crochet Shorts: Small Business Tips
Want to turn your hobby into profit? Handmade crochet shorts are trending on platforms like Etsy, Instagram, and craft fairs.
Business Tips
- Offer size variety and custom options.
- Use eco-friendly packaging.
- Price based on time, materials, and skill.
- Display your items in styled photo shoots.
Marketing Ideas
- Share behind-the-scenes photos of your progress.
- Create reels or TikToks showing how you make them.
- Collaborate with influencers or fashion bloggers.
Video Tutorial:
Final Thoughts: Your Crochet Wardrobe Starts Here
Creating your own easy crochet shorts is about more than just fashion. It’s a journey of creativity, skill, and self-expression. You control the process, and the end result is not only stylish but truly one-of-a-kind.
Whether you’re crocheting for fun, fashion, or business, these shorts are a beautiful blend of comfort, creativity, and customization. The next time someone compliments your outfit, you can smile and say, “Thanks — I made them!”
Now it’s time to grab your yarn, pick a pattern, and hook your way into handmade fashion.
You may be interested:
- Master the Art of the Lace Flower Crochet Stitch
- Easy Knitted Slipper Socks You Can Make
- How to Crochet a Charming Daisy Motif: A Step-by-Step Pattern
- Crochet Square Basket: A Very Useful Accessory


