Crocheting has always been a craft that brings comfort, style, and personalization into the world of handmade fashion. Among the many wearable items that continue to gain popularity, fingerless crochet gloves stand out due to their practicality, versatility, and elegant look. Add flowers into the mix, and you have a stunning accessory that combines warmth with a touch of whimsical charm. Whether you are a seasoned crocheter or just starting your journey with yarn, creating your own pair of fingerless crochet gloves with floral embellishments is both an achievable and rewarding project.
In this comprehensive blog, we will explore the entire process in rich detail—from choosing your yarn and hook, understanding the glove structure, designing the flowers, and finally bringing it all together into a stylish accessory. We’ll also explore variations, creative ideas, tips for customizing sizes, troubleshooting common issues, and ideas for turning your gloves into gifts or items for sale.
Let’s dive deep into the art of crafting beautiful fingerless crochet gloves with flowers, one stitch at a time.
Why Fingerless Crochet Gloves Are a Must-Have Handmade Item
Fingerless gloves serve as a practical and fashionable solution for chilly days. They provide warmth while keeping your fingers free for texting, typing, or crafting. Crocheting them allows for endless customization—from the yarn weight and texture to stitch patterns and embellishments like flowers. When done right, these gloves can be an everyday essential or a statement piece that complements various outfits.
Adding crocheted flowers adds a layer of artistic detail, allowing you to express personality, seasonality, or even align with fashion trends. They make perfect gifts and are wonderful projects for craft fairs and online stores. The best part? You only need a few materials and a bit of dedication.
What You’ll Learn in This Blog
- Materials and tools needed
- How to measure and size gloves
- Step-by-step glove construction
- Flower crochet techniques and placement ideas
- Variations and stitch alternatives
- How to finish and care for your gloves
- Selling and gifting ideas
- Troubleshooting common issues
- Customization for all seasons
This guide is created with care to ensure you can make gloves that not only look professional but feel personal. Whether you’re making them for yourself, as a thoughtful gift, or to sell in your handmade shop, these gloves are sure to become a cherished item.
Materials You’ll Need for Fingerless Crochet Gloves with Flowers
Before we dive into stitching, it’s essential to gather the materials. Here is a detailed list with tips on choosing the best options for your gloves:
- Yarn
- Recommended Yarn Type: DK (Double Knit) or Worsted Weight yarn for gloves; lightweight cotton or acrylic for flowers.
- Fiber Choice: Wool or wool-blend for warmth; cotton or bamboo for breathable, springtime gloves.
- Color Suggestions: Neutrals for gloves (gray, cream, black) and brights or pastels for flowers (pink, yellow, lavender, coral).
- Crochet Hook
- Common sizes: 3.5mm (E), 4mm (G), or 4.5mm (7).
- Choose a size based on your yarn label or desired fabric tightness.
- Tapestry Needle
- For weaving in ends and attaching flowers.
- Scissors
- A small pair will work best for clean cuts.
- Measuring Tape
- To customize glove sizing.
- Optional Embellishments
- Buttons, beads, or small pearls for flower centers.
- Stitch Markers
- To help you keep track of rounds or specific points.
Now that your tools are ready, it’s time to prepare your hands for some fun stitching.
Understanding Glove Construction: Anatomy of Fingerless Gloves
Fingerless gloves might seem like complex accessories, but they are surprisingly simple once you break down the structure. Most crochet gloves follow this basic format:
- Cuff: The bottom band that wraps around the wrist. Often worked in rows using a ribbed stitch like slip stitch or single crochet back loop only.
- Hand Section: The main body of the glove, typically worked in the round.
- Thumb Hole: A split or gap in the fabric that’s either left open during the hand section or created separately and joined later.
- Top Edging: Decorative or functional edging around the fingers.
- Flower Embellishment Area: Typically placed on the back of the hand or around the wrist.
Having a mental blueprint makes it easier to follow the pattern and improvise where necessary.
Taking Measurements and Choosing the Right Size
Proper fit is crucial for comfort and appearance. Fingerless gloves generally follow these dimensions:
- Wrist Circumference: Measure snugly around your wrist.
- Hand Width: Measure across your knuckles (excluding thumb).
- Glove Length: Measure from wrist to just below the fingers or higher depending on style.
Standard adult sizes range from 6 to 8 inches in circumference. However, you can customize your pattern with simple math:
- Make a gauge swatch using your chosen yarn and hook.
- Measure how many stitches and rows fit in one inch.
- Multiply your hand width by the stitches per inch to calculate your foundation chain or starting stitches.
Keep these numbers handy as we move into the actual crochet instructions.
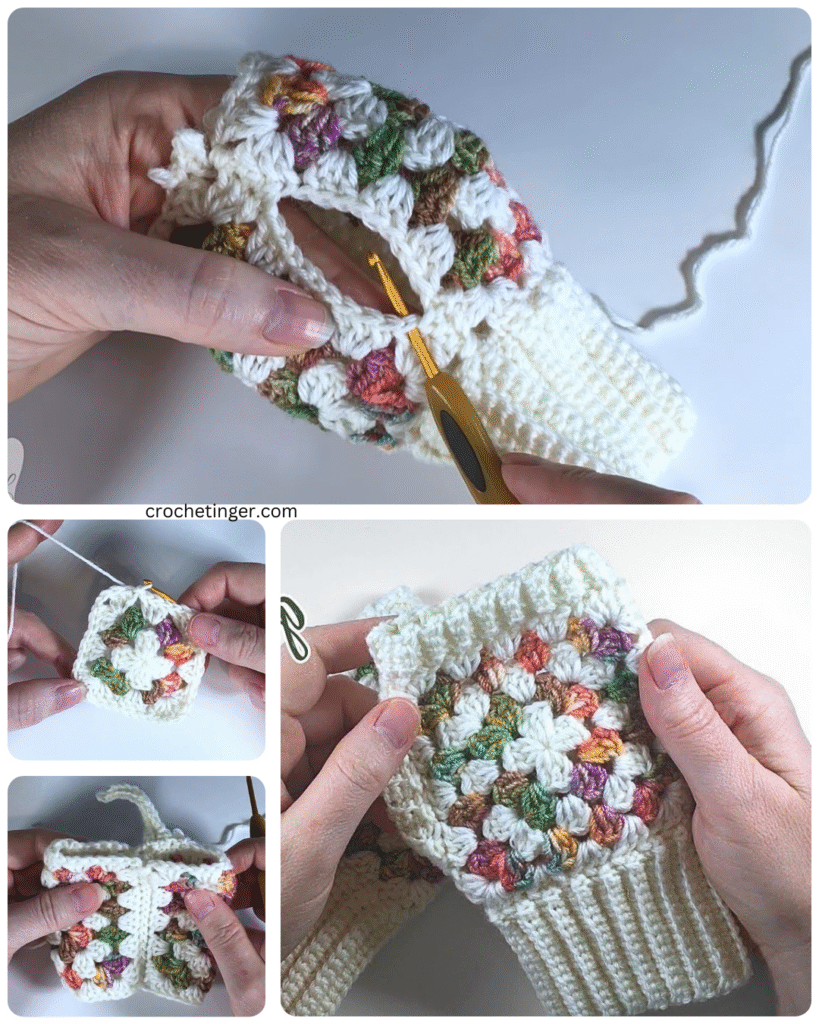
Step-by-Step Pattern for Basic Fingerless Crochet Gloves with Flower Embellishments
Let’s create the base glove first. Then we’ll explore different ways to add flowers.
Glove Base Pattern (Fits Medium Adult Hand)
Cuff
- Chain 13
- Row 1: SC in 2nd ch from hook and across (12 sts). Ch 1, turn.
- Rows 2–30: SC in back loop only across. Ch 1, turn.
- Fold in half and slip stitch ends together to form a cuff loop. Do not fasten off.
Hand Section
- Turn work to begin crocheting along the long edge.
- Round 1: SC evenly around the cuff edge (approx. 30 sts). Join with sl st.
- Rounds 2–10: SC in each st around.
- Round 11: Thumb opening — SC 15, chain 5, skip 5 stitches, SC in next stitch, complete round.
- Round 12: SC in each st and chain space (30 sts).
- Rounds 13–15: SC around.
- Fasten off and weave in ends.
Repeat for the second glove.
Now comes the part that transforms this glove into a work of wearable art—the flowers.
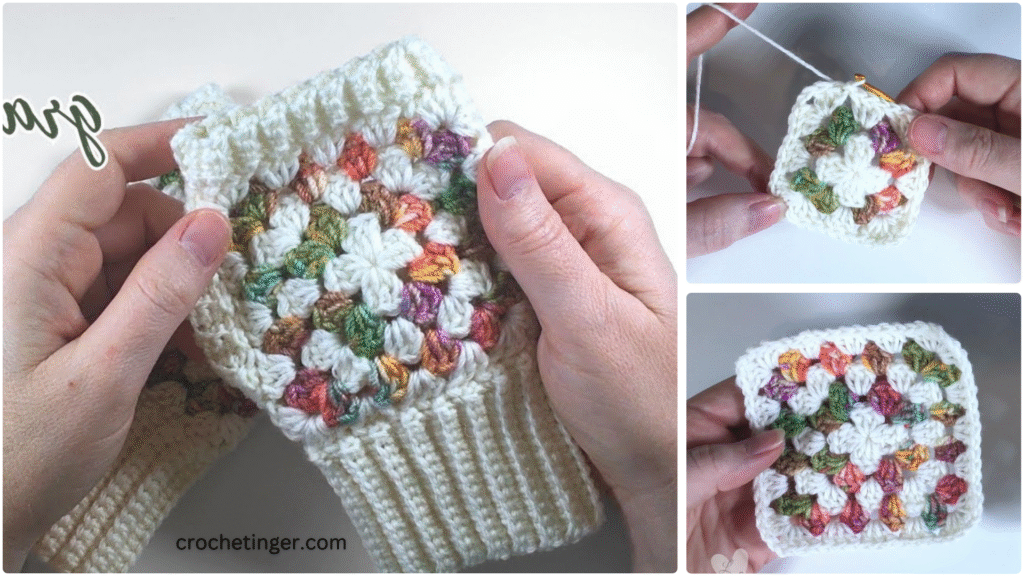
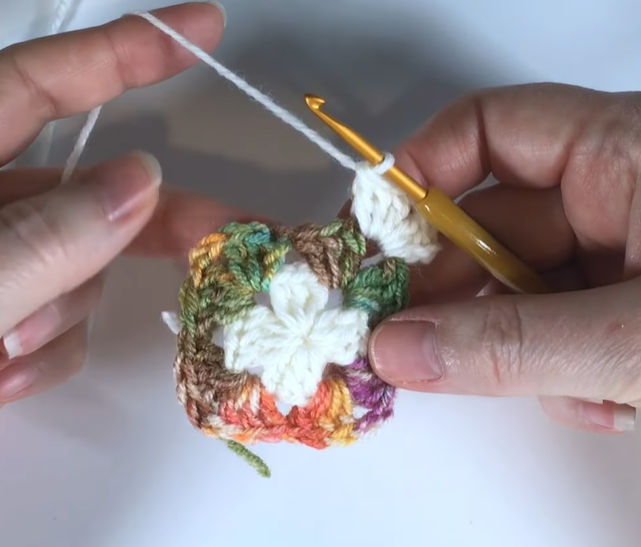
Crochet Flower Embellishments
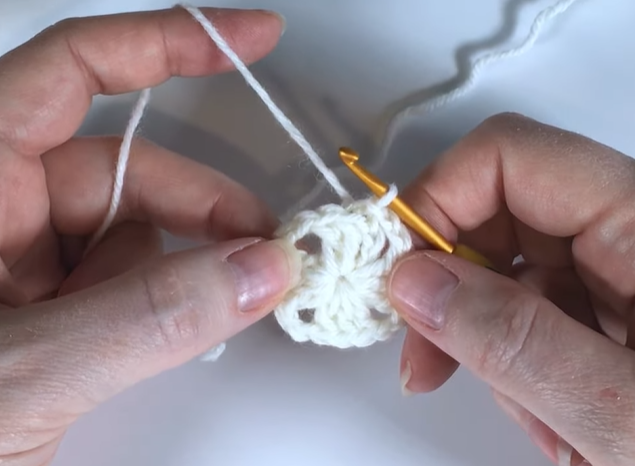
Let’s start with a classic 5-petal flower:
Small 5-Petal Flower
- Magic Ring
- Round 1: Ch 1, work 5 SC into ring. Join.
- Round 2: (Ch 2, 2 DC in next st, Ch 2, sl st in same st) repeat 5 times for 5 petals.
- Fasten off, leave a long tail for sewing.
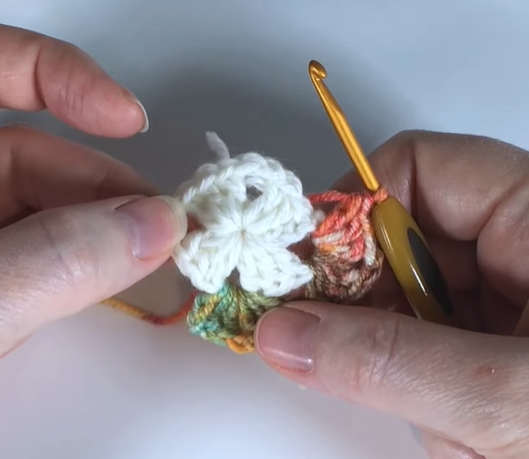
You can create multiple flowers in different sizes and colors for layering effects. For example:
- Large Layered Flower: Two 5-petal flowers stacked together, petals offset.
- Tiny Buds: Chain 3, sl st in first chain to form a ring, then add 3 HDC inside. Simple and sweet!
How to Attach Crochet Flowers to Your Fingerless Gloves
Once you have crocheted your desired number of flowers, it’s time to securely and artistically attach them to your gloves. Placement is key to making them stand out while ensuring they don’t interfere with function.
Best Placement Ideas:
- Back of the Hand: The most common and eye-catching position. Place one large flower or a small cluster above the knuckles.
- Wrist Area: A floral “bracelet” effect can be created by attaching flowers around the base of the glove.
- Side Edge: A vertical line of small flowers up the glove’s outer seam can create a charming accent.
Steps to Sew on Flowers:
- Thread a tapestry needle with the flower’s long yarn tail.
- Place the flower where you want it and insert the needle from the underside of the glove through a stitch on the flower.
- Sew around the base of each petal to keep the flower flat and secure.
- Knot the yarn on the inside and weave in the ends.
You can add decorative buttons, beads, or embroidery in the center of each flower for extra elegance. If the gloves are for a baby or young child, avoid small embellishments unless they are securely fastened to prevent choking hazards.
Advanced Customizations for Your Fingerless Crochet Gloves with Flowers
Now that you’ve mastered the basic glove and floral motif, it’s time to branch out creatively. These ideas will help make your gloves even more personalized and stylish.
1. Use Fancy Stitches for the Hand Section:
Instead of simple single crochet, try more textured or openwork stitches:
- Shell Stitch for a feminine, lacy look
- Puff Stitch for warmth and volume
- Crossed DC for a woven appearance
- V-Stitch for airier gloves suitable for warmer weather
2. Add Lacy Edges:
Edging at the wrist or finger openings can elevate your gloves:
- Picot edge: (Ch 3, sl st in first ch), repeat around edge.
- Scalloped edge: (5 DC in one stitch, skip one stitch, sl st in next), repeat around.
3. Color Blocking:
Use contrasting yarn colors for the cuff, hand, and flowers. This can match outfits or reflect seasonal themes like:
- Autumn: Rust, mustard, and olive green
- Spring: Lavender, mint, and pastel pink
- Winter: Icy blue, white, and silver
- Summer: Coral, turquoise, and lime green

4. Incorporate Beads or Sequins:
Thread beads onto your yarn before crocheting flowers to add sparkle.
5. Add Thumb Gussets:
If you want better thumb coverage, crochet an extension on the thumb opening:
- After the base glove is complete, rejoin yarn at the thumbhole and work 5–6 rounds of SC, decreasing slightly every round.
Seasonal and Themed Fingerless Glove Variations
Fingerless gloves are wearable year-round when you adjust materials and themes. Here are some seasonal interpretations:
Spring Blossoms:
- Lightweight cotton yarn
- Open stitch patterns for breathability
- Soft pastel colors
- Embroidered vines or tiny butterflies around the wrist
Summer Style:
- Lacy gloves with thin bamboo yarn
- Light flowers or no embellishment for a minimalist look
- Pair with summer dresses or festival outfits
Autumn Warmth:
- Rich earth-tone yarns like burgundy, mustard, and chocolate brown
- Dense stitching for warmth
- Sunflower or maple-leaf-shaped flowers
Winter Magic:
- Wool or alpaca yarn for insulation
- Snowflake-inspired floral motifs
- Use sparkle yarns or metallic threads for holiday glamour

Gifting Fingerless Gloves with Flowers: A Handmade Statement of Care
These gloves make beautiful handmade gifts. Consider personalizing them further:
- Embroider the recipient’s initials inside the cuff
- Package in a matching crochet pouch
- Pair with a matching flower headband or scarf
Gift ideas include:
- Holiday presents
- Mother’s Day or Valentine’s Day
- Bridal showers or baby showers
- Teacher appreciation gifts
- Handmade birthday surprises
Attach a care tag with washing instructions: “Hand wash in cold water. Lay flat to dry.”
Selling Fingerless Crochet Gloves with Flowers: From Passion to Profit
If you’re looking to monetize your crochet skills, these gloves are a great product. They’re quick to make, highly customizable, and universally loved. Here are tips for turning your hobby into income:
Product Photography:
- Use natural lighting and neutral backgrounds
- Show close-ups of flower details and glove fit
- Include pictures of gloves on a model or mannequin hand
Pricing Tips:
- Consider time + materials + profit
- Price according to complexity (simple gloves can be less; flower-covered, embellished gloves can fetch more)

Where to Sell:
- Etsy or other handmade marketplaces
- Local craft fairs
- Boutique consignment
- Your own website or Instagram shop
Marketing Tips:
- Highlight the handmade, customizable nature
- Offer bundles (gloves + matching accessories)
- Share behind-the-scenes photos or videos of your crafting process
Common Problems and How to Solve Them
Even seasoned crocheters can run into issues. Here’s how to troubleshoot common problems:
Problem 1: Glove Too Tight or Loose
Solution: Check your gauge and adjust hook size accordingly. Add or subtract stitches to fit your hand measurement.
Problem 2: Uneven Edges
Solution: Use stitch markers at the beginning of each round. Always count stitches to ensure consistency.
Problem 3: Flower Doesn’t Lie Flat
Solution: Try blocking the flower. Or use fewer stitches in each petal if it’s curling up.
Problem 4: Thumbhole Too Small
Solution: Increase the chain space or add a few extra SC rounds around the thumb opening.
Problem 5: Yarn Ends Poking Out
Solution: Weave in ends thoroughly and trim carefully. Use a bit of fabric glue for extra security if desired.

Tips for Caring for Handmade Gloves
Proper care ensures your gloves last long and stay beautiful.
- Washing: Hand wash in cool water with mild detergent
- Drying: Lay flat on a towel; never wring or hang
- Storage: Store flat in a drawer or cloth bag
- Avoid: Harsh sunlight, bleach, or tumble drying
Expanding the Concept: Beyond Gloves
If you enjoyed making these gloves, try expanding the flower embellishment idea to other crochet projects:
- Flower headbands or ear warmers
- Flower-covered bags or clutches
- Floral wrist cuffs or anklets
- Matching scarf and gloves sets
- Boho-style tops or festival vests
You can even repurpose leftover flower motifs into brooches or keychains.
Video Tutorial:
Conclusion: A Journey Worth Every Stitch
Fingerless crochet gloves with flowers are more than just an accessory—they’re a creative expression of warmth, love, and craftsmanship. Every stitch carries intention, every flower tells a story, and each pair you complete reflects your skill and creativity. Whether you’re crocheting for personal joy, heartfelt gifting, or a growing handmade business, these gloves offer endless possibilities.
Through this in-depth guide, you’ve learned how to make a well-fitted glove, add beautiful flower embellishments, customize for style and season, and even turn your craft into a source of income. With every pair you make, you’ll refine your technique and expand your design vision.
So pick up your hook, choose your yarn, and start creating your own wearable floral masterpieces today.
You may be interested:
- Master the Art of the Lace Flower Crochet Stitch
- Easy Knitted Slipper Socks You Can Make
- Crochet Baby Basketball Shoes: A Playful and Stylish Project for Every Skill Level
- Crochet Lace Waves Motif