
If you’re searching for a heartfelt handmade gift for a new baby, you can’t go wrong with a pair of adorable crochet baby sandals. Lightweight, comfortable, and utterly charming, baby sandals make the perfect present for baby showers, newborn announcements, or just as a special surprise.
In this complete guide, we’re diving deep into the world of crochet baby sandals — from choosing the right materials to step-by-step instructions, customization ideas, expert tips, troubleshooting common mistakes, and inspiring project variations.
Whether you’re a beginner crocheter or an experienced yarn artist, this blog is packed with everything you need to confidently create a beautiful, professional-quality pair of baby sandals.
Why Crochet Baby Sandals?
When it comes to handmade baby gifts, there are plenty of options — but crochet baby sandals stand out for many reasons:
Practical and Cute
Baby sandals aren’t just adorable; they’re also lightweight enough for warm weather, easy to slip on tiny feet, and help keep little toes protected.
Fast to Make
Even if you’re short on time, you can whip up a pair of baby sandals in just a few hours.
Highly Customizable
From colors to embellishments like buttons, flowers, and bows, you can personalize baby sandals to match the baby’s outfit, the nursery theme, or the season.
Keepsake Value
Handmade gifts carry a special sentimental value. Years from now, parents will still treasure those tiny crocheted sandals you made.
The Ideal Yarn for Crochet Baby Sandals
Choosing the right yarn is critical to creating a comfortable and safe pair of sandals for babies.
Characteristics to Look For
- Softness: Baby skin is delicate. Choose a yarn that feels gentle against the skin.
- Breathability: Cotton yarns allow air to circulate and are ideal for warm-weather sandals.
- Durability: Babies kick and squirm. Your yarn should withstand tugging and washing.
Recommended Yarn Types
- 100% Cotton Yarn (best choice): Soft, breathable, and easy to care for.
- Cotton Blend Yarn (like cotton-bamboo): Offers a little stretch and even more softness.
- Organic Yarn: If you’re concerned about chemicals or dyes, organic cotton yarn is a fantastic option.
Suggested Yarn Weights
- Sport weight (2) or DK weight (3) yarn works well.
These weights create sandals that are sturdy but still flexible.
Avoid very chunky yarns, as they may make the sandals too bulky for small baby feet.
Choosing the Right Hook
The size of your crochet hook will affect the tightness and overall structure of the sandals.
- For DK or sport weight yarn, a 3.5 mm to 4.5 mm crochet hook is ideal.
- Tighter stitches make the soles sturdier, which is good for sandals.
Always check your gauge and adjust your hook size if necessary to achieve the right dimensions.
Other Materials You’ll Need
- Yarn needle for weaving in ends
- Sharp scissors
- Stitch markers (optional but helpful for beginners)
- Small buttons for sandal straps (optional)
- Measuring tape to ensure size accuracy
Optional: Anti-slip fabric for the soles if you want to make walking sandals for toddlers.

Basic Crochet Stitches You Should Know
You don’t need to be an expert to make baby sandals! You’ll mainly use:
- Chain stitch (ch)
- Slip stitch (sl st)
- Single crochet (sc)
- Half double crochet (hdc)
- Double crochet (dc)
- Increase (2 stitches in the same stitch)
Take a few minutes to review these stitches if you’re new or a bit rusty.
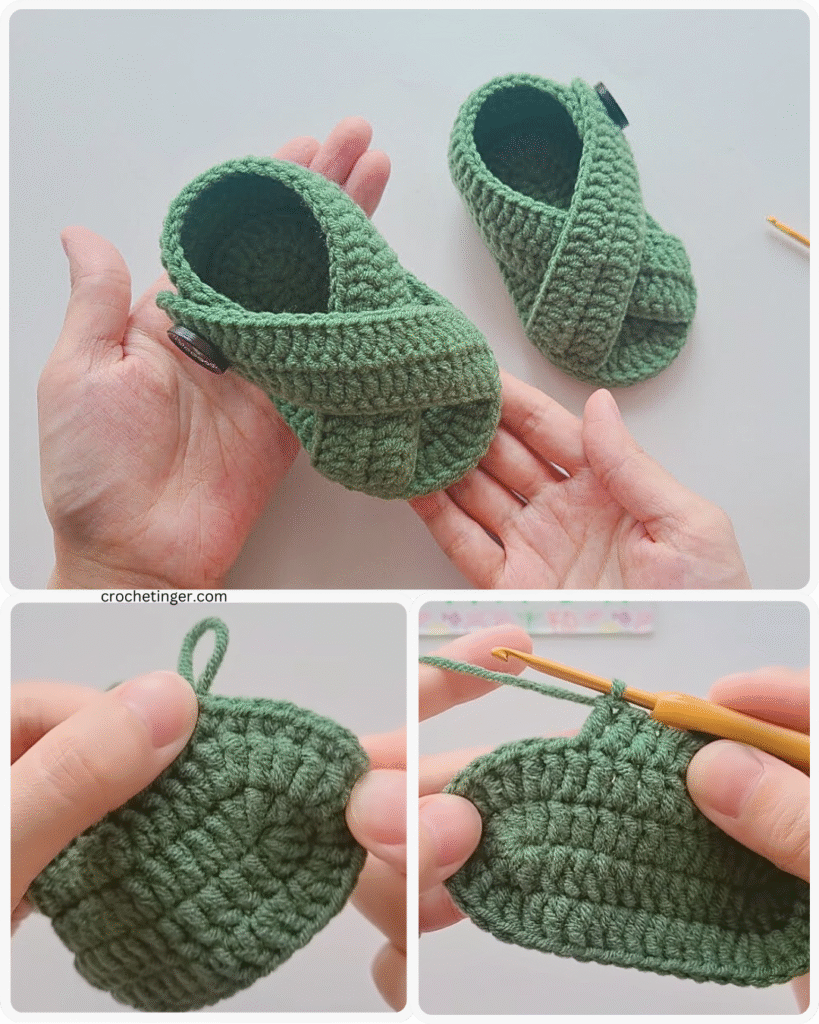
Step-by-Step Tutorial: Easy Crochet Baby Sandals
Let’s walk through a basic, beginner-friendly sandal pattern suitable for babies aged 0–3 months. We’ll break it down carefully for clarity.
Abbreviations
- ch: chain
- sl st: slip stitch
- sc: single crochet
- hdc: half double crochet
- dc: double crochet
- st: stitch
- inc: increase (2 stitches in the same stitch)
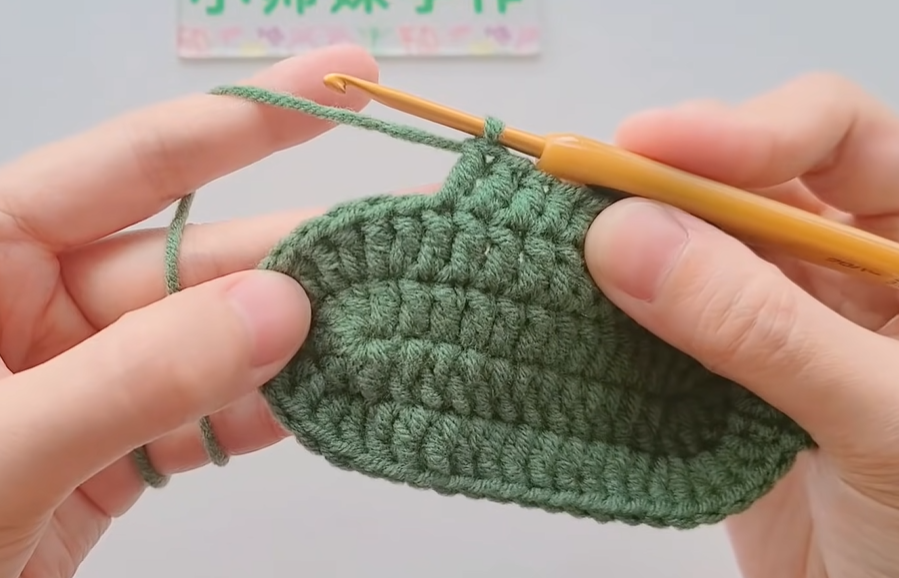
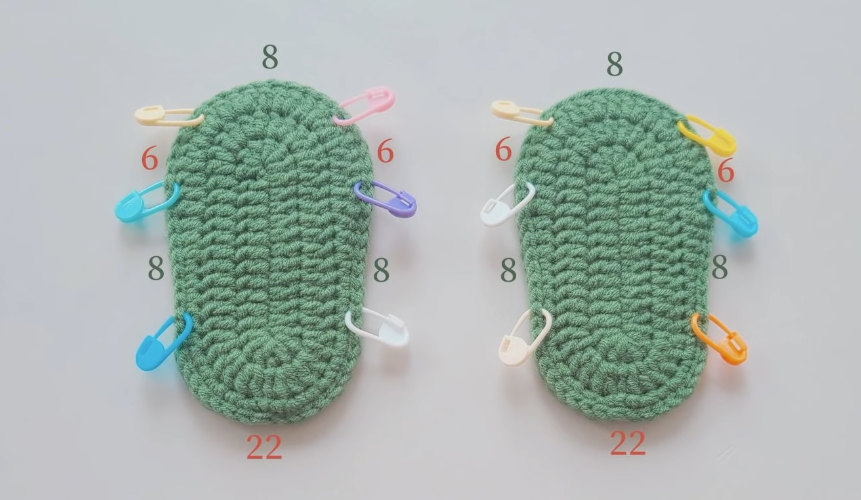
Foundation: Creating the Sole
- Chain 11.
- Round 1:
- 2 sc into the 2nd ch from hook.
- 1 sc in next 8 ch.
- 5 sc in last ch.
- Working along the opposite side of the foundation chain: 1 sc in next 8 ch.
- 3 sc in last ch (same ch as the first 2 sc).
- Join with a sl st to the first sc. (26 sts)
- Round 2:
- Ch 1.
- 2 sc in first st.
- 1 sc in next 8 sts.
- 2 sc in next 5 sts.
- 1 sc in next 8 sts.
- 2 sc in next 3 sts.
- Join with a sl st. (34 sts)
- Round 3:
- Ch 1.
- 1 sc in each st around.
- Join with a sl st. (34 sts)
This forms the sole. It’s oval-shaped and firm.
Creating the Upper Part
- Ch 1, sc in next 12 sts.
- Ch 10 (forms a strap), sl st back into the same sc to create a loop.
- Sc around the remaining sole, joining with a sl st.
You now have one side strap formed!
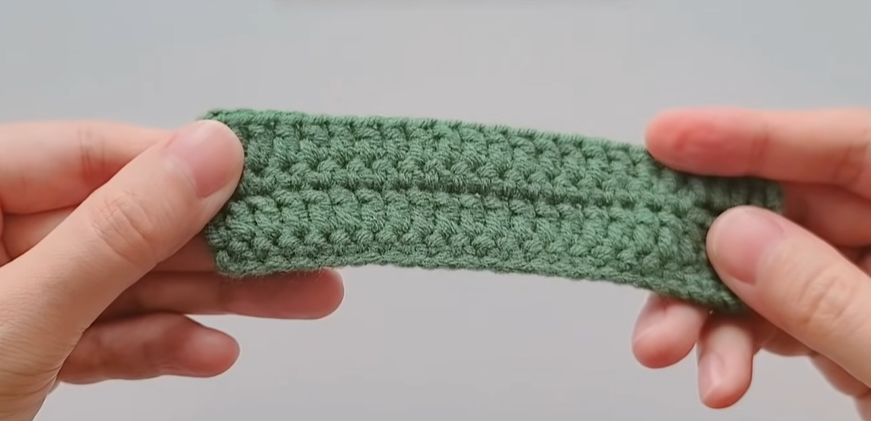
Forming the Toe Strap
- From where you are, count 8 stitches from the strap loop.
- Attach yarn to the 8th stitch.
- Ch 1, sc in next 6 stitches.
- Turn, ch 1, sc across the 6 sts.
- Repeat for 3 more rows.
This creates the strap that goes over the top of the foot.
Connecting the Toe Strap
- Bring the toe strap across the sandal.
- Sew or sl st the strap neatly onto the opposite side.
- Secure tightly, weave in ends.
Making the Second Sandal
Follow the same steps, but mirror the strap placement so the loop faces the opposite direction.
Congratulations — you just made a pair of adorable baby sandals!
Size Adjustments
Want to make sandals for slightly older babies?
- Increase the starting chain by 2–4 stitches for a larger sole.
- Add extra rows to the sole (always increasing evenly around).
- Adjust strap lengths proportionally.
Typical Baby Foot Sizes:
- 0–3 months: 3.5” sole
- 3–6 months: 4” sole
- 6–9 months: 4.5” sole
Always check with a measuring tape if possible!
Customization Ideas for Crochet Baby Sandals
One of the best parts about handmade crochet is personalization. Here are some fun ways to customize your sandals:
Color Play
- Use different colors for the sole and upper.
- Try ombre yarns for a gorgeous gradient look.
Embellishments
- Add tiny crocheted flowers to the straps.
- Sew on small bows.
- Use mini pom-poms at the center for playful vibes.
Buttons and Closures
- Attach small wooden or plastic buttons to fasten the side strap.
- Use decorative toggles or snaps for easy dressing.
Themed Sandals
- Make nautical sandals (navy, white, and red).
- Try pastel baby shower themes (mint, peach, lavender).
- Create holiday sandals (green and red for Christmas babies).
Adding Soft Linings
For extra luxury, you can sew a small patch of soft fabric inside the sole.
Tips for a Professional Finish
Even simple sandals can look store-bought with a few polish techniques:
- Keep your tension even throughout.
- Always weave in your ends neatly and securely.
- Block the finished sandals gently if needed to shape.
- Use matching thread when sewing parts together.
Common Mistakes and How to Fix Them
Here’s how to handle potential hiccups:
Uneven Soles
- Ensure you are increasing symmetrically.
- Count your stitches carefully each round.
Twisted Straps
- Always double-check strap orientation before sewing.
Too Tight or Too Loose
- Adjust hook size up or down depending on your tension.
- Practice first with scrap yarn if necessary.
Caring for Handmade Crochet Baby Sandals
Babies get everything messy — so making your sandals washable is a big plus.
- Always use washable yarn.
- Hand wash in lukewarm water with mild soap.
- Reshape and lay flat to dry.
Pro Tip: Include a small care instructions card with your gift!
Gift Presentation Ideas
Presentation elevates your gift from thoughtful to unforgettable.
- Place sandals inside a small gift box lined with tissue paper.
- Attach a personalized tag: “Handmade with love for your tiny toes.”
- Pair sandals with a matching crocheted headband or bib.
Advanced Variations for Ambitious Crocheters
Once you’re confident with basic sandals, try these ideas:
- Two-Tone Sandals: Different colors for sole and straps.
- Gladiator Baby Sandals: Add extra ankle straps.
- Espadrille Style: Use natural jute yarn for the soles.
The possibilities are endless!
Video Tutorial:
Conclusion: A Gift from the Heart
Making crochet baby sandals isn’t just about crafting an item — it’s about creating a memory, a keepsake, and a token of love that families will treasure forever.
By following this detailed guide, choosing soft and beautiful materials, customizing your design, and putting care into every stitch, you’ll have a handmade gift that stands out from anything bought in a store.
So grab your hook, pick out that adorable yarn, and start creating a pair (or several!) of beautiful crochet baby sandals today. Whether you make them for a special little one in your life or for charity donations, the love and joy you stitch into every pair will shine through.
Happy crocheting!
You may be interested:


