
Crocheting a simple and easy crochet square is a great project for beginners. Follow this step-by-step pattern to create your very first crochet square:
Skill Level: Intermediate
Materials you’ll need:
- Crochet hook (size H/5.0mm or similar)
- Worsted weight yarn (or any yarn of your choice)
- Scissors
- Yarn needle
Abbreviations:
- ch: chain
- sc: single crochet
- dc: double crochet
- sl st: slip stitch
Instructions: Note: This pattern is worked in rows and then joined together to form a square.
Pattern: 1
Step 1: Slip Knot
Start by creating a slip knot on your crochet hook.
Step 2: Foundation Chain
Chain 4 stitches.
Step 3: Forming the Ring
Place your hook into the initial chain you created (the one nearest to the hook). Next, yarn over and draw through the loop on the hook, forming a small ring.
Step 4: Round 1
Begin by forming a chain of 3 stitches, which will serve as your initial double crochet stitch. Following this, crochet 2 double crochet stitches into the ring to establish the first cluster of 3 double crochet stitches, often referred to as a 3-dc cluster. Proceed by chaining 2 stitches, then crochet 3 double crochet stitches into the ring once more. Repeat these steps outlined between the asterisks (*) a total of three additional times. As a result, you’ll achieve four 3-dc clusters, each spaced apart by chain-2 intervals.
Step 5: Closing
In Round 1, following the final 3-dc cluster, create a chain of 2 stitches and proceed to slip the stitch into the top of the initial chain-3 to unite the round. This action completes Round 1 while shaping the corners of your square.
Step 6: Round 2
Start by chaining 3, counting it as your initial double crochet. Then, stitch 2 double crochet into that very same chain-2 space, establishing your initial 3-dc cluster for Round 2. Move to the subsequent chain-2 space (the corner space) and craft 3 double crochet stitches. Keep repeating these steps enclosed by * and * for a total of four times. By the end, you’ll have formed four 3-dc clusters within Round 2.
Step 7: Closing Round 2
Following the final 3-dc cluster in Round 2, skip chaining 2. Instead, complete the round by slip stitching into the top of the initial chain-3.
Step 8: Fasten Off
Cut the yarn, leaving a tail of about 6 inches. Pull the tail through the loop on your hook and pull tight to secure the end.
Step 9: Weaving in Ends
Use a yarn needle to weave in the loose ends into the stitches on the back of your crochet square to secure them.
Pattern: 2
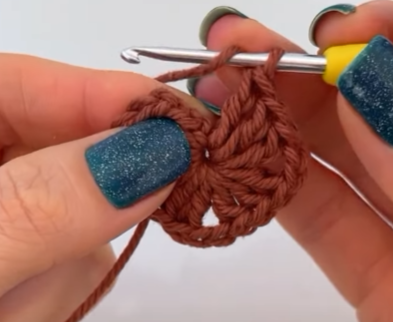
Step 1: Making the Center Ring
- Let’s kick things off with a slip knot: Leave around 6 inches of yarn and create a loop. Slide the hook through the loop, catch the working yarn, and draw it through the loop. Give the loop a gentle tug to snug it around the hook.
- Make a chain of 4: To initiate the center ring, wrap the yarn over the hook and pull it through the loop on the hook four times, crafting four chain stitches.
- Form a ring by joining: Place the hook into the first chain stitch made (the one nearest to the slip knot). Wrap the yarn over and pull it through both the loop on the hook and the loop on the chain to craft a slip stitch. This action connects the chain, shaping it into a ring.
Step 2: Round 1
- Begin with a chain of 3 stitches, counting as the initial double crochet for this pattern.
- Create 2 double crochets within the ring: Wrap the yarn over, insert the hook into the center of the ring, wrap the yarn over, pull up a loop (resulting in 3 loops on the hook), yarn over, pull through two loops (leaving 2 loops remaining), yarn over, and pull through the last two loops to complete the first double crochet (DC). Repeat these steps once more for another DC within the ring.
- Chain 2: Once the 2 DCs are finished, create a chain of 2 stitches.
- Make 3 DCs inside the ring: Repeat the process for making 2 DCs, but this time, craft 3 double crochets within the ring.
- Chain 2: Following the completion of the 3 DCs, chain 2 once more.
- Create 3 DCs inside the ring: Duplicate the process once again to form the third set of 3 DCs.
- Chain 2: After completing the 3 DCs, chain 2 again.
- Connect the round: To finalize round 1 and form a square, insert the hook into the top chain of the initial chain 3. Wrap the yarn over and pull it through the chain and the loop on the hook to create a slip stitch.
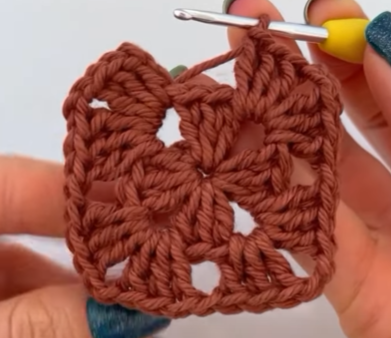
Step 3: Round 2
- Connect to the chain-2 corner space by slipping stitches: Traverse across the subsequent two stitches by slipping stitches until you arrive at the corner chain-2 space for the upcoming round.
- Begin with a chain of 3 (considered as the initial DC) and produce 2 DC within the same corner space.
- Chain 2: Following the completion of the 3 DC, create a chain of 2.
- Craft 3 DC within the same corner space: This establishes the first corner of Round 2.
- Chain 1: Post the corner formation, chain 1.
- Execute (3 DC, Ch 2, 3 DC) within the subsequent corner space: Transition to the subsequent corner space and execute (3 DC, chain 2, 3 DC) to shape the subsequent corner.
- Chain 1: Following the corner’s completion, chain 1.
- Repeat the sixth step within the remaining two corner spaces: Perform (3 DC, chain 2, 3 DC) within each of the two remaining corner spaces.
- Chain 1: Once the last corner is completed, chain 1.
- Seal the round: To finalize Round 2 and transform it into a square, insert the hook into the top chain of the initial chain-3. Yarn over and pull through the chain and the loop on the hook to create a slip stitch.
Step 4: Round 3
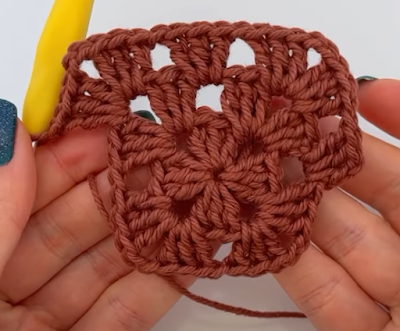
- Connect to the chain-2 corner space by slipping the stitch, moving across the next two stitches until reaching the corner chain-2 space.
- Begin with a chain of 3, which serves as the initial double crochet (DC), and create 2 DC within that same corner space.
- Following the completion of the 3 DC, proceed with a chain of 2.
- Establish the first corner of Round 3 by making 3 DC in the same corner space.
- After forming the corner, chain 1.
- Execute the pattern of (3 DC in the next chain-1 space, chain 1) three times: Carry out 3 DC stitches, separated by a chain 1, in the subsequent chain-1 space along the side. Repeat this sequence twice more along the side.
- Subsequently, chain 1 after finishing the side.
- Transition to the next corner space and execute (3 DC, chain 2, 3 DC) to shape the succeeding corner.
- Repeat steps 5-7 for the remaining three sides: Work the side pattern, then construct the corner (3 DC, chain 2, 3 DC) in each of the remaining three corner spaces.
- Conclude Round 3 and create a square by joining it: Insert the hook into the top chain of the starting chain 3. Yarn over and draw through the chain and the loop on the hook, forming a slip stitch.
Step 5: Fastening Off
- Cut the yarn: Leave a tail of about 6 inches.
- Fasten off: Pull the yarn through the loop on the hook and tighten it to secure the last stitch.
Step 6: Finishing
- Weave in the ends: Use the yarn needle to weave in the yarn tails on the backside of the square to secure them and hide them from view.
Video tutorial:
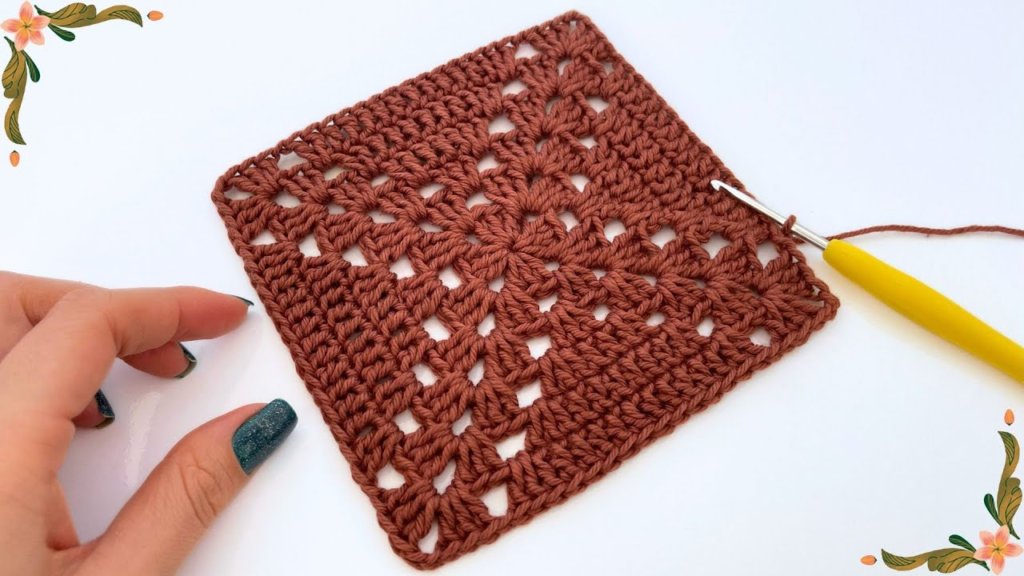
Congratulations! You’ve completed a simple crochet square. You can make more squares and join them together to create blankets, scarves, or any other project you like! Remember to practice and have fun with your crocheting journey.
You may be interested:
- How to Crochet a Gorgeous Red Rose: A Step-by-Step Guide
- PERFECT THIS BEAUTIFUL SUPER EASY SUNFLOWER COATER MODEL
- CROCHET SQUARE WITH DIFFERENT HIGHLIGHTS – Free Pattern
- How to Crochet a Beautiful Slipper: A Step-by-Step Guide


